防止在追踪中记录敏感数据
在某些情况下,出于隐私或安全原因,您可能需要防止追踪的输入和输出被记录。LangSmith 提供了一种在将追踪发送到 LangSmith 后端之前过滤其输入和输出的方法。
如果您想完全隐藏追踪的输入和输出,可以在运行应用程序时设置以下环境变量
LANGSMITH_HIDE_INPUTS=true
LANGSMITH_HIDE_OUTPUTS=true
这适用于 LangSmith SDK(Python 和 TypeScript)和 LangChain。
您还可以为给定的 Client 实例自定义和覆盖此行为。这可以通过在 Client 对象上设置 hide_inputs 和 hide_outputs 参数来完成(TypeScript 中为 hideInputs 和 hideOutputs)。
对于下面的示例,我们将简单地为 hide_inputs 和 hide_outputs 返回一个空对象,但您可以根据需要进行自定义。
- Python
- TypeScript
import openai
from langsmith import Client
from langsmith.wrappers import wrap_openai

openai_client = wrap_openai(openai.Client())
langsmith_client = Client(
  hide_inputs=lambda inputs: {}, hide_outputs=lambda outputs: {}
)

# The trace produced will have its metadata present, but the inputs will be hidden
openai_client.chat.completions.create(
  model="gpt-4o-mini",
  messages=[
      {"role": "system", "content": "You are a helpful assistant."},
      {"role": "user", "content": "Hello!"},
  ],
  langsmith_extra={"client": langsmith_client},
)

# The trace produced will not have hidden inputs and outputs
openai_client.chat.completions.create(
  model="gpt-4o-mini",
  messages=[
      {"role": "system", "content": "You are a helpful assistant."},
      {"role": "user", "content": "Hello!"},
  ],
)
import OpenAI from "openai";
import { Client } from "langsmith";
import { wrapOpenAI } from "langsmith/wrappers";

const langsmithClient = new Client({
hideInputs: (inputs) => ({}),
hideOutputs: (outputs) => ({}),
});

// The trace produced will have its metadata present, but the inputs will be hidden
const filteredOAIClient = wrapOpenAI(new OpenAI(), {
  client: langsmithClient,
});
await filteredOAIClient.chat.completions.create({
  model: "gpt-4o-mini",
  messages: [
    { role: "system", content: "You are a helpful assistant." },
    { role: "user", content: "Hello!" },
  ],
});
const openaiClient = wrapOpenAI(new OpenAI());
// The trace produced will not have hidden inputs and outputs
await openaiClient.chat.completions.create({
  model: "gpt-4o-mini",
  messages: [
    { role: "system", content: "You are a helpful assistant." },
    { role: "user", content: "Hello!" },
  ],
});
基于规则的输入和输出屏蔽
此功能在以下 LangSmith SDK 版本中可用
- Python:0.1.81 及以上
- TypeScript:0.1.33 及以上
要屏蔽输入和输出中的特定数据,可以使用 create_anonymizer / createAnonymizer 函数,并在实例化客户端时传入新创建的匿名器。匿名器可以由正则表达式模式列表和替换值构建,也可以由接受并返回字符串值的函数构建。
如果 LANGSMITH_HIDE_INPUTS = true,则将跳过输入的匿名化。如果 LANGSMITH_HIDE_OUTPUTS = true,则输出也适用相同规则。
但是,如果输入或输出要发送到客户端,则匿名器方法将优先于 hide_inputs 和 hide_outputs 中找到的函数。默认情况下,create_anonymizer 最多只会查找 10 层嵌套深度,这可以通过 max_depth 参数进行配置。
- Python
- TypeScript
from langsmith.anonymizer import create_anonymizer
from langsmith import Client, traceable
import re

# create anonymizer from list of regex patterns and replacement values
anonymizer = create_anonymizer([
    { "pattern": r"[a-zA-Z0-9._%+-]+@[a-zA-Z0-9.-]+.[a-zA-Z]{2,}", "replace": "<email-address>" },
    { "pattern": r"[0-9a-fA-F]{8}-[0-9a-fA-F]{4}-[0-9a-fA-F]{4}-[0-9a-fA-F]{4}-[0-9a-fA-F]{12}", "replace": "<UUID>" }
])

# or create anonymizer from a function
email_pattern = re.compile(r"[a-zA-Z0-9._%+-]+@[a-zA-Z0-9.-]+.[a-zA-Z]{2,}")
uuid_pattern = re.compile(r"[0-9a-fA-F]{8}-[0-9a-fA-F]{4}-[0-9a-fA-F]{4}-[0-9a-fA-F]{4}-[0-9a-fA-F]{12}")

anonymizer = create_anonymizer(
    lambda text: email_pattern.sub("<email-address>", uuid_pattern.sub("<UUID>", text))
)

client = Client(anonymizer=anonymizer)

@traceable(client=client)
def main(inputs: dict) -> dict:
    ...
import { createAnonymizer } from "langsmith/anonymizer"
import { traceable } from "langsmith/traceable"
import { Client } from "langsmith"

// create anonymizer from list of regex patterns and replacement values
const anonymizer = createAnonymizer([
    { pattern: /[a-zA-Z0-9._%+-]+@[a-zA-Z0-9.-]+.[a-zA-Z]{2,}/g, replace: "<email>" },
    { pattern: /[0-9a-fA-F]{8}-[0-9a-fA-F]{4}-[0-9a-fA-F]{4}-[0-9a-fA-F]{4}-[0-9a-fA-F]{12}/g, replace: "<uuid>" }
])

// or create anonymizer from a function
const anonymizer = createAnonymizer((value) => value.replace("...", "<value>"))

const client = new Client({ anonymizer })

const main = traceable(async (inputs: any) => {
    // ...
}, { client })
请注意,使用匿名器可能会因复杂的正则表达式或大型有效载荷而导致性能下降,因为匿名器在处理前会将有效载荷序列化为 JSON。
提高匿名器 API 的性能是我们的路线图上的目标!如果您遇到性能问题,请通过 support@langchain.dev 联系我们。
旧版本的 LangSmith SDK 可以使用 hide_inputs 和 hide_outputs 参数来实现相同的效果。您还可以使用这些参数更高效地处理输入和输出。
- Python
- TypeScript
import re
from langsmith import Client, traceable
# Define the regex patterns for email addresses and UUIDs
EMAIL_REGEX = r"[a-zA-Z0-9._%+-]+@[a-zA-Z0-9.-]+.[a-zA-Z]{2,}"
UUID_REGEX = r"[0-9a-fA-F]{8}-[0-9a-fA-F]{4}-[0-9a-fA-F]{4}-[0-9a-fA-F]{4}-[0-9a-fA-F]{12}"
def replace_sensitive_data(data, depth=10):
if depth == 0:
return data
if isinstance(data, dict):
return {k: replace_sensitive_data(v, depth-1) for k, v in data.items()}
elif isinstance(data, list):
return [replace_sensitive_data(item, depth-1) for item in data]
elif isinstance(data, str):
data = re.sub(EMAIL_REGEX, "<email-address>", data)
data = re.sub(UUID_REGEX, "<UUID>", data)
return data
else:
return data
client = Client(
hide_inputs=lambda inputs: replace_sensitive_data(inputs),
hide_outputs=lambda outputs: replace_sensitive_data(outputs)
)
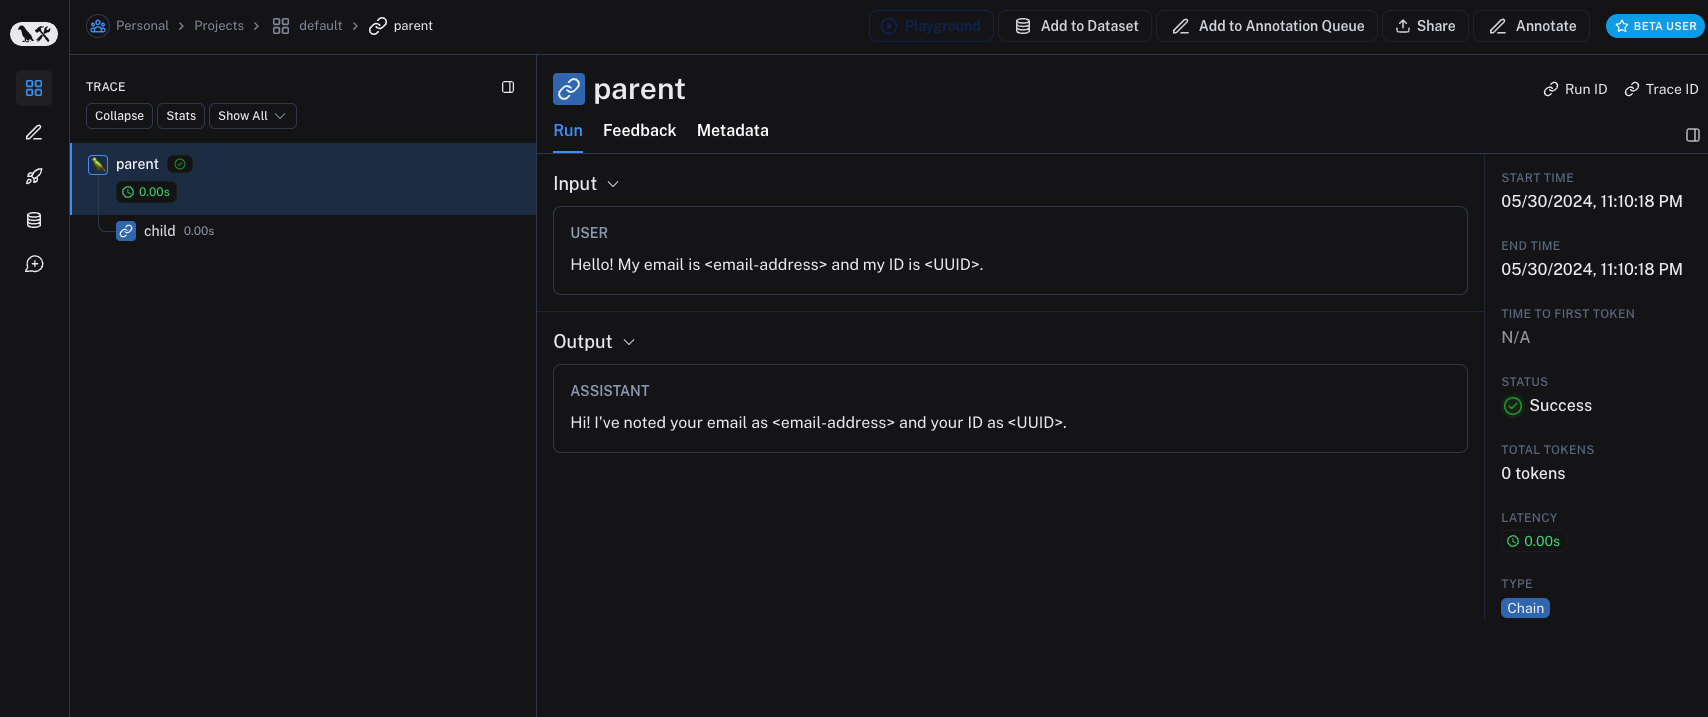
inputs = {"role": "user", "content": "Hello! My email is user@example.com and my ID is 123e4567-e89b-12d3-a456-426614174000."}
outputs = {"role": "assistant", "content": "Hi! I've noted your email as user@example.com and your ID as 123e4567-e89b-12d3-a456-426614174000."}
@traceable(client=client)
def child(inputs: dict) -> dict:
return outputs
@traceable(client=client)
def parent(inputs: dict) -> dict:
child_outputs = child(inputs)
return child_outputs
parent(inputs)
import { Client } from "langsmith";
import { traceable } from "langsmith/traceable";

// Define the regex patterns for email addresses and UUIDs
const EMAIL_REGEX = /[a-zA-Z0-9._%+-]+@[a-zA-Z0-9.-]+.[a-zA-Z]{2,}/g;
const UUID_REGEX = /[0-9a-fA-F]{8}-[0-9a-fA-F]{4}-[0-9a-fA-F]{4}-[0-9a-fA-F]{4}-[0-9a-fA-F]{12}/g;

function replaceSensitiveData(data: any, depth: number = 10): any {
  if (depth === 0) return data;

  if (typeof data === "object" && !Array.isArray(data)) {
      const result: Record<string, any> = {};
      for (const [key, value] of Object.entries(data)) {
          result[key] = replaceSensitiveData(value, depth - 1);
      }
      return result;
  } else if (Array.isArray(data)) {
      return data.map(item => replaceSensitiveData(item, depth - 1));
  } else if (typeof data === "string") {
      return data.replace(EMAIL_REGEX, "<email-address>").replace(UUID_REGEX, "<UUID>");
  } else {
      return data;
  }
}

const langsmithClient = new Client({
  hideInputs: (inputs) => replaceSensitiveData(inputs),
  hideOutputs: (outputs) => replaceSensitiveData(outputs)
});

const inputs = {
  role: "user",
  content: "Hello! My email is user@example.com and my ID is 123e4567-e89b-12d3-a456-426614174000."
};

const outputs = {
  role: "assistant",
  content: "Hi! I've noted your email as <email-address> and your ID as <UUID>."
};

const child = traceable(async (inputs: any) => {
  return outputs;
}, { name: "child", client: langsmithClient });

const parent = traceable(async (inputs: any) => {
  const childOutputs = await child(inputs);
  return childOutputs;
}, { name: "parent", client: langsmithClient });

await parent(inputs)
处理单个函数的输入和输出
Python 版 LangSmith SDK 0.1.98 及更高版本中提供了 process_outputs 参数。
除了客户端级别的输入和输出处理之外,LangSmith 还通过 @traceable 装饰器的 process_inputs 和 process_outputs 参数提供函数级别的处理。
这些参数接受函数,允许您在将特定函数的输入和输出记录到 LangSmith 之前对其进行转换。这对于减小有效载荷大小、删除敏感信息或自定义对象在 LangSmith 中如何序列化和表示以用于特定函数非常有用。
以下是 process_inputs 和 process_outputs 的使用示例
from langsmith import traceable

def process_inputs(inputs: dict) -> dict:
    # inputs is a dictionary where keys are argument names and values are the provided arguments
    # Return a new dictionary with processed inputs
    return {
        "processed_key": inputs.get("my_cool_key", "default"),
        "length": len(inputs.get("my_cool_key", ""))
    }

def process_outputs(output: Any) -> dict:
    # output is the direct return value of the function
    # Transform the output into a dictionary
    # In this case, "output" will be an integer
    return {"processed_output": str(output)}

@traceable(process_inputs=process_inputs, process_outputs=process_outputs)
def my_function(my_cool_key: str) -> int:
    # Function implementation
    return len(my_cool_key)

result = my_function("example")
在此示例中,process_inputs 创建了一个包含已处理输入数据的新字典,而 process_outputs 在记录到 LangSmith 之前将输出转换为特定格式。
建议避免在处理器函数中修改源对象。相反,应创建并返回包含已处理数据的新对象。
对于异步函数,用法类似
@traceable(process_inputs=process_inputs, process_outputs=process_outputs)
async def async_function(key: str) -> int:
    # Async implementation
    return len(key)
当函数级别处理器和客户端级别处理器(hide_inputs 和 hide_outputs)都定义时,函数级别处理器优先。
快速入门
您可以将基于规则的屏蔽与各种匿名器结合使用,以清除输入和输出中的敏感信息。在此操作指南中,我们将介绍如何使用正则表达式、Microsoft Presidio 和 Amazon Comprehend。
正则表达式
下面的实现并非详尽无遗,可能会遗漏某些格式或边缘情况。在生产环境中使用任何实现之前,请务必进行彻底测试。
您可以使用正则表达式在将输入和输出发送到 LangSmith 之前对其进行屏蔽。下面的实现屏蔽了电子邮件地址、电话号码、全名、信用卡号和社会安全号。
import re
import openai
from langsmith import Client
from langsmith.wrappers import wrap_openai

# Define regex patterns for various PII
SSN_PATTERN = re.compile(r'\b\d{3}-\d{2}-\d{4}\b')
CREDIT_CARD_PATTERN = re.compile(r'\b(?:\d[ -]*?){13,16}\b')
EMAIL_PATTERN = re.compile(r'\b[A-Za-z0-9._%+-]+@[A-Za-z0-9.-]+\.[A-Z|a-z]{2,7}\b')
PHONE_PATTERN = re.compile(r'\b(?:\+?1[-.\s]?)?\(?\d{3}\)?[-.\s]?\d{3}[-.\s]?\d{4}\b')
FULL_NAME_PATTERN = re.compile(r'\b([A-Z][a-z]*\s[A-Z][a-z]*)\b')

def regex_anonymize(text):
    """
    Anonymize sensitive information in the text using regex patterns.

    Args:
        text (str): The input text to be anonymized.

    Returns:
        str: The anonymized text.
    """
    # Replace sensitive information with placeholders
    text = SSN_PATTERN.sub('[REDACTED SSN]', text)
    text = CREDIT_CARD_PATTERN.sub('[REDACTED CREDIT CARD]', text)
    text = EMAIL_PATTERN.sub('[REDACTED EMAIL]', text)
    text = PHONE_PATTERN.sub('[REDACTED PHONE]', text)
    text = FULL_NAME_PATTERN.sub('[REDACTED NAME]', text)
    return text

def recursive_anonymize(data, depth=10):
    """
    Recursively traverse the data structure and anonymize sensitive information.
    Args:
        data (any): The input data to be anonymized.
        depth (int): The current recursion depth to prevent excessive recursion.

    Returns:
        any: The anonymized data.
    """
    if depth == 0:
        return data

    if isinstance(data, dict):
        anonymized_dict = {}
        for k, v in data.items():
            anonymized_value = recursive_anonymize(v, depth - 1)
            anonymized_dict[k] = anonymized_value
        return anonymized_dict
    elif isinstance(data, list):
        anonymized_list = []
        for item in data:
            anonymized_item = recursive_anonymize(item, depth - 1)
            anonymized_list.append(anonymized_item)
        return anonymized_list
    elif isinstance(data, str):
        anonymized_data = regex_anonymize(data)
        return anonymized_data
    else:
        return data

openai_client = wrap_openai(openai.Client())

# Initialize the LangSmith client with the anonymization functions
langsmith_client = Client(
    hide_inputs=recursive_anonymize, hide_outputs=recursive_anonymize
)

# The trace produced will have its metadata present, but the inputs and outputs will be anonymized
response_with_anonymization = openai_client.chat.completions.create(
    model="gpt-4o-mini",
    messages=[
        {"role": "system", "content": "You are a helpful assistant."},
        {"role": "user", "content": "My name is John Doe, my SSN is 123-45-6789, my credit card number is 4111 1111 1111 1111, my email is john.doe@example.com, and my phone number is (123) 456-7890."},
    ],
    langsmith_extra={"client": langsmith_client},
)

# The trace produced will not have anonymized inputs and outputs
response_without_anonymization = openai_client.chat.completions.create(
    model="gpt-4o-mini",
    messages=[
        {"role": "system", "content": "You are a helpful assistant."},
        {"role": "user", "content": "My name is John Doe, my SSN is 123-45-6789, my credit card number is 4111 1111 1111 1111, my email is john.doe@example.com, and my phone number is (123) 456-7890."},
    ],
)
匿名化后的运行在 LangSmith 中将显示如下: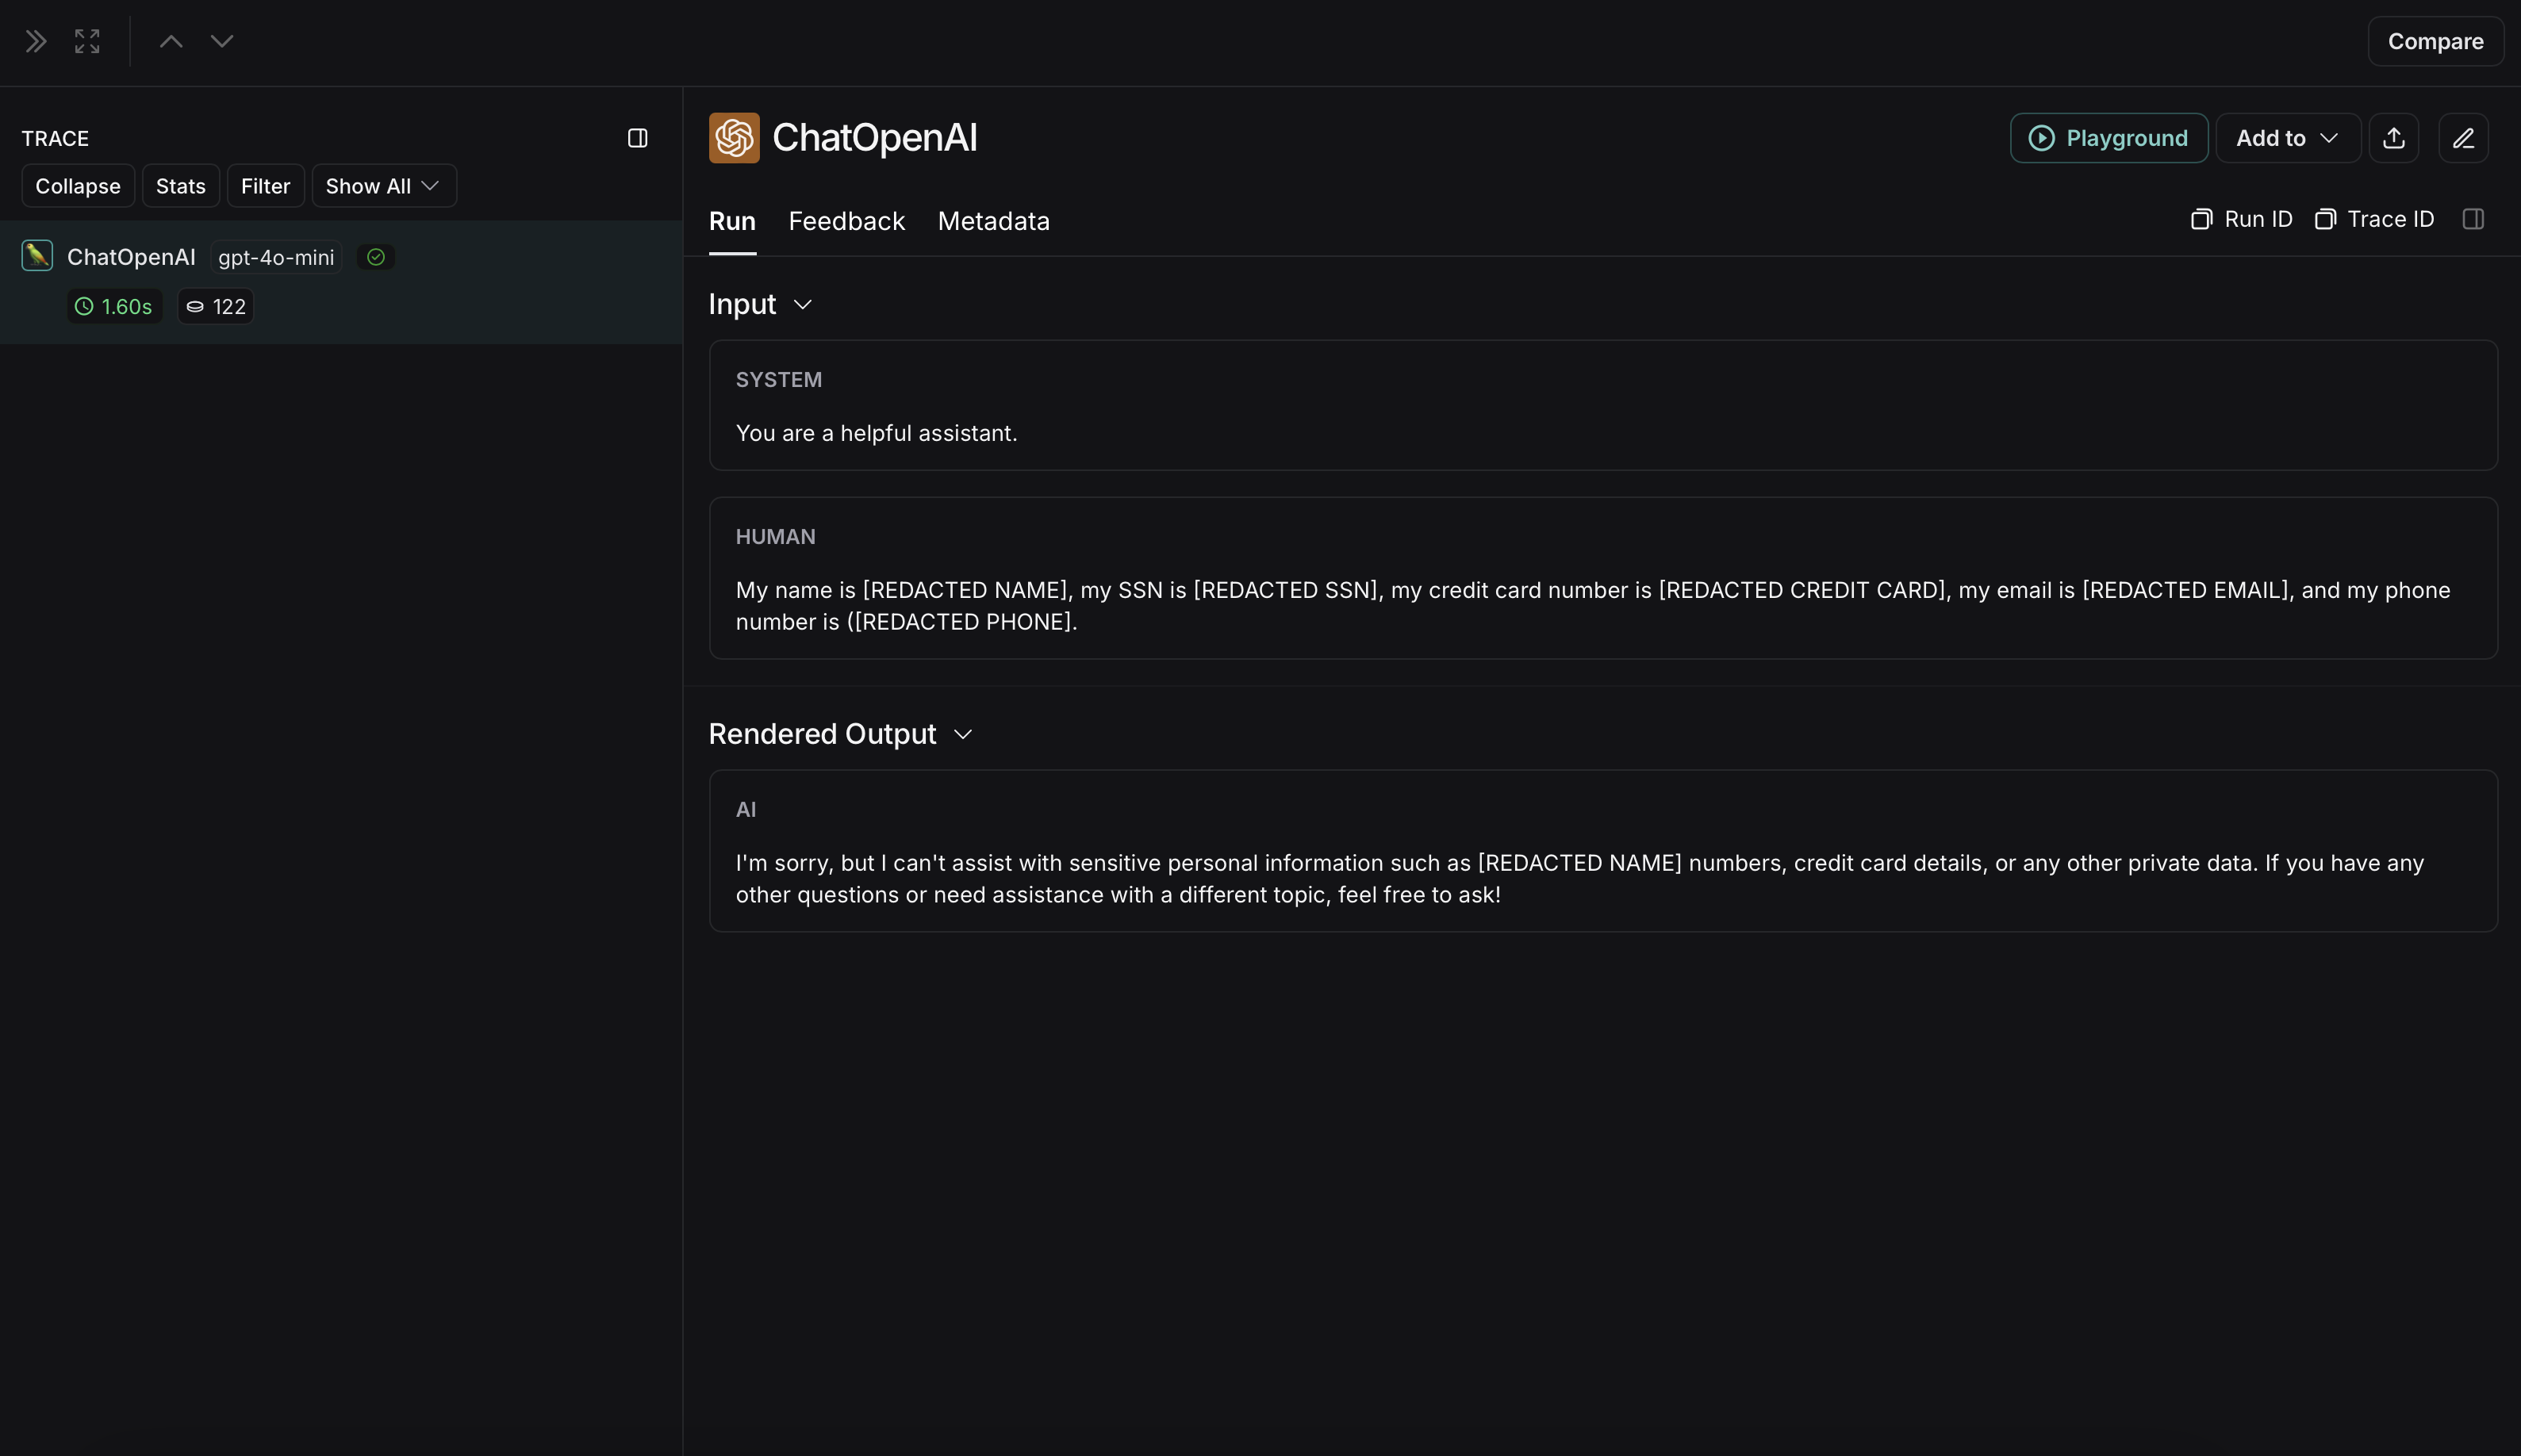
未匿名化运行在 LangSmith 中将显示如下:
Microsoft Presidio
下面的实现提供了一个通用示例,说明如何匿名化用户与 LLM 之间交换消息中的敏感信息。它并非详尽无遗,也未涵盖所有情况。在生产环境中使用任何实现之前,请务必进行彻底测试。
Microsoft Presidio 是一个数据保护和去标识化 SDK。下面的实现使用 Presidio 在将输入和输出发送到 LangSmith 之前对其进行匿名化。有关最新信息,请参阅 Presidio 的官方文档。
要使用 Presidio 及其 spaCy 模型,请安装以下内容
pip install presidio-analyzer
pip install presidio-anonymizer
python -m spacy download en_core_web_lg
另外,安装 OpenAI
pip install openai
import openai
from langsmith import Client
from langsmith.wrappers import wrap_openai
from presidio_anonymizer import AnonymizerEngine
from presidio_analyzer import AnalyzerEngine
anonymizer = AnonymizerEngine()
analyzer = AnalyzerEngine()
def presidio_anonymize(data):
"""
Anonymize sensitive information sent by the user or returned by the model.
Args:
data (any): The data to be anonymized.
Returns:
any: The anonymized data.
"""
message_list = (
data.get('messages') or [data.get('choices', [{}])[0].get('message')]
)
if not message_list or not all(isinstance(msg, dict) and msg for msg in message_list):
return data
for message in message_list:
content = message.get('content', '')
if not content.strip():
print("Empty content detected. Skipping anonymization.")
continue
results = analyzer.analyze(
text=content,
entities=["PERSON", "PHONE_NUMBER", "EMAIL_ADDRESS", "US_SSN"],
language='en'
)
anonymized_result = anonymizer.anonymize(
text=content,
analyzer_results=results
)
message['content'] = anonymized_result.text
return data
openai_client = wrap_openai(openai.Client())
# initialize the langsmith client with the anonymization functions
langsmith_client = Client(
hide_inputs=presidio_anonymize, hide_outputs=presidio_anonymize
)
# The trace produced will have its metadata present, but the inputs and outputs will be anonymized
response_with_anonymization = openai_client.chat.completions.create(
model="gpt-4o-mini",
messages=[
{"role": "system", "content": "You are a helpful assistant."},
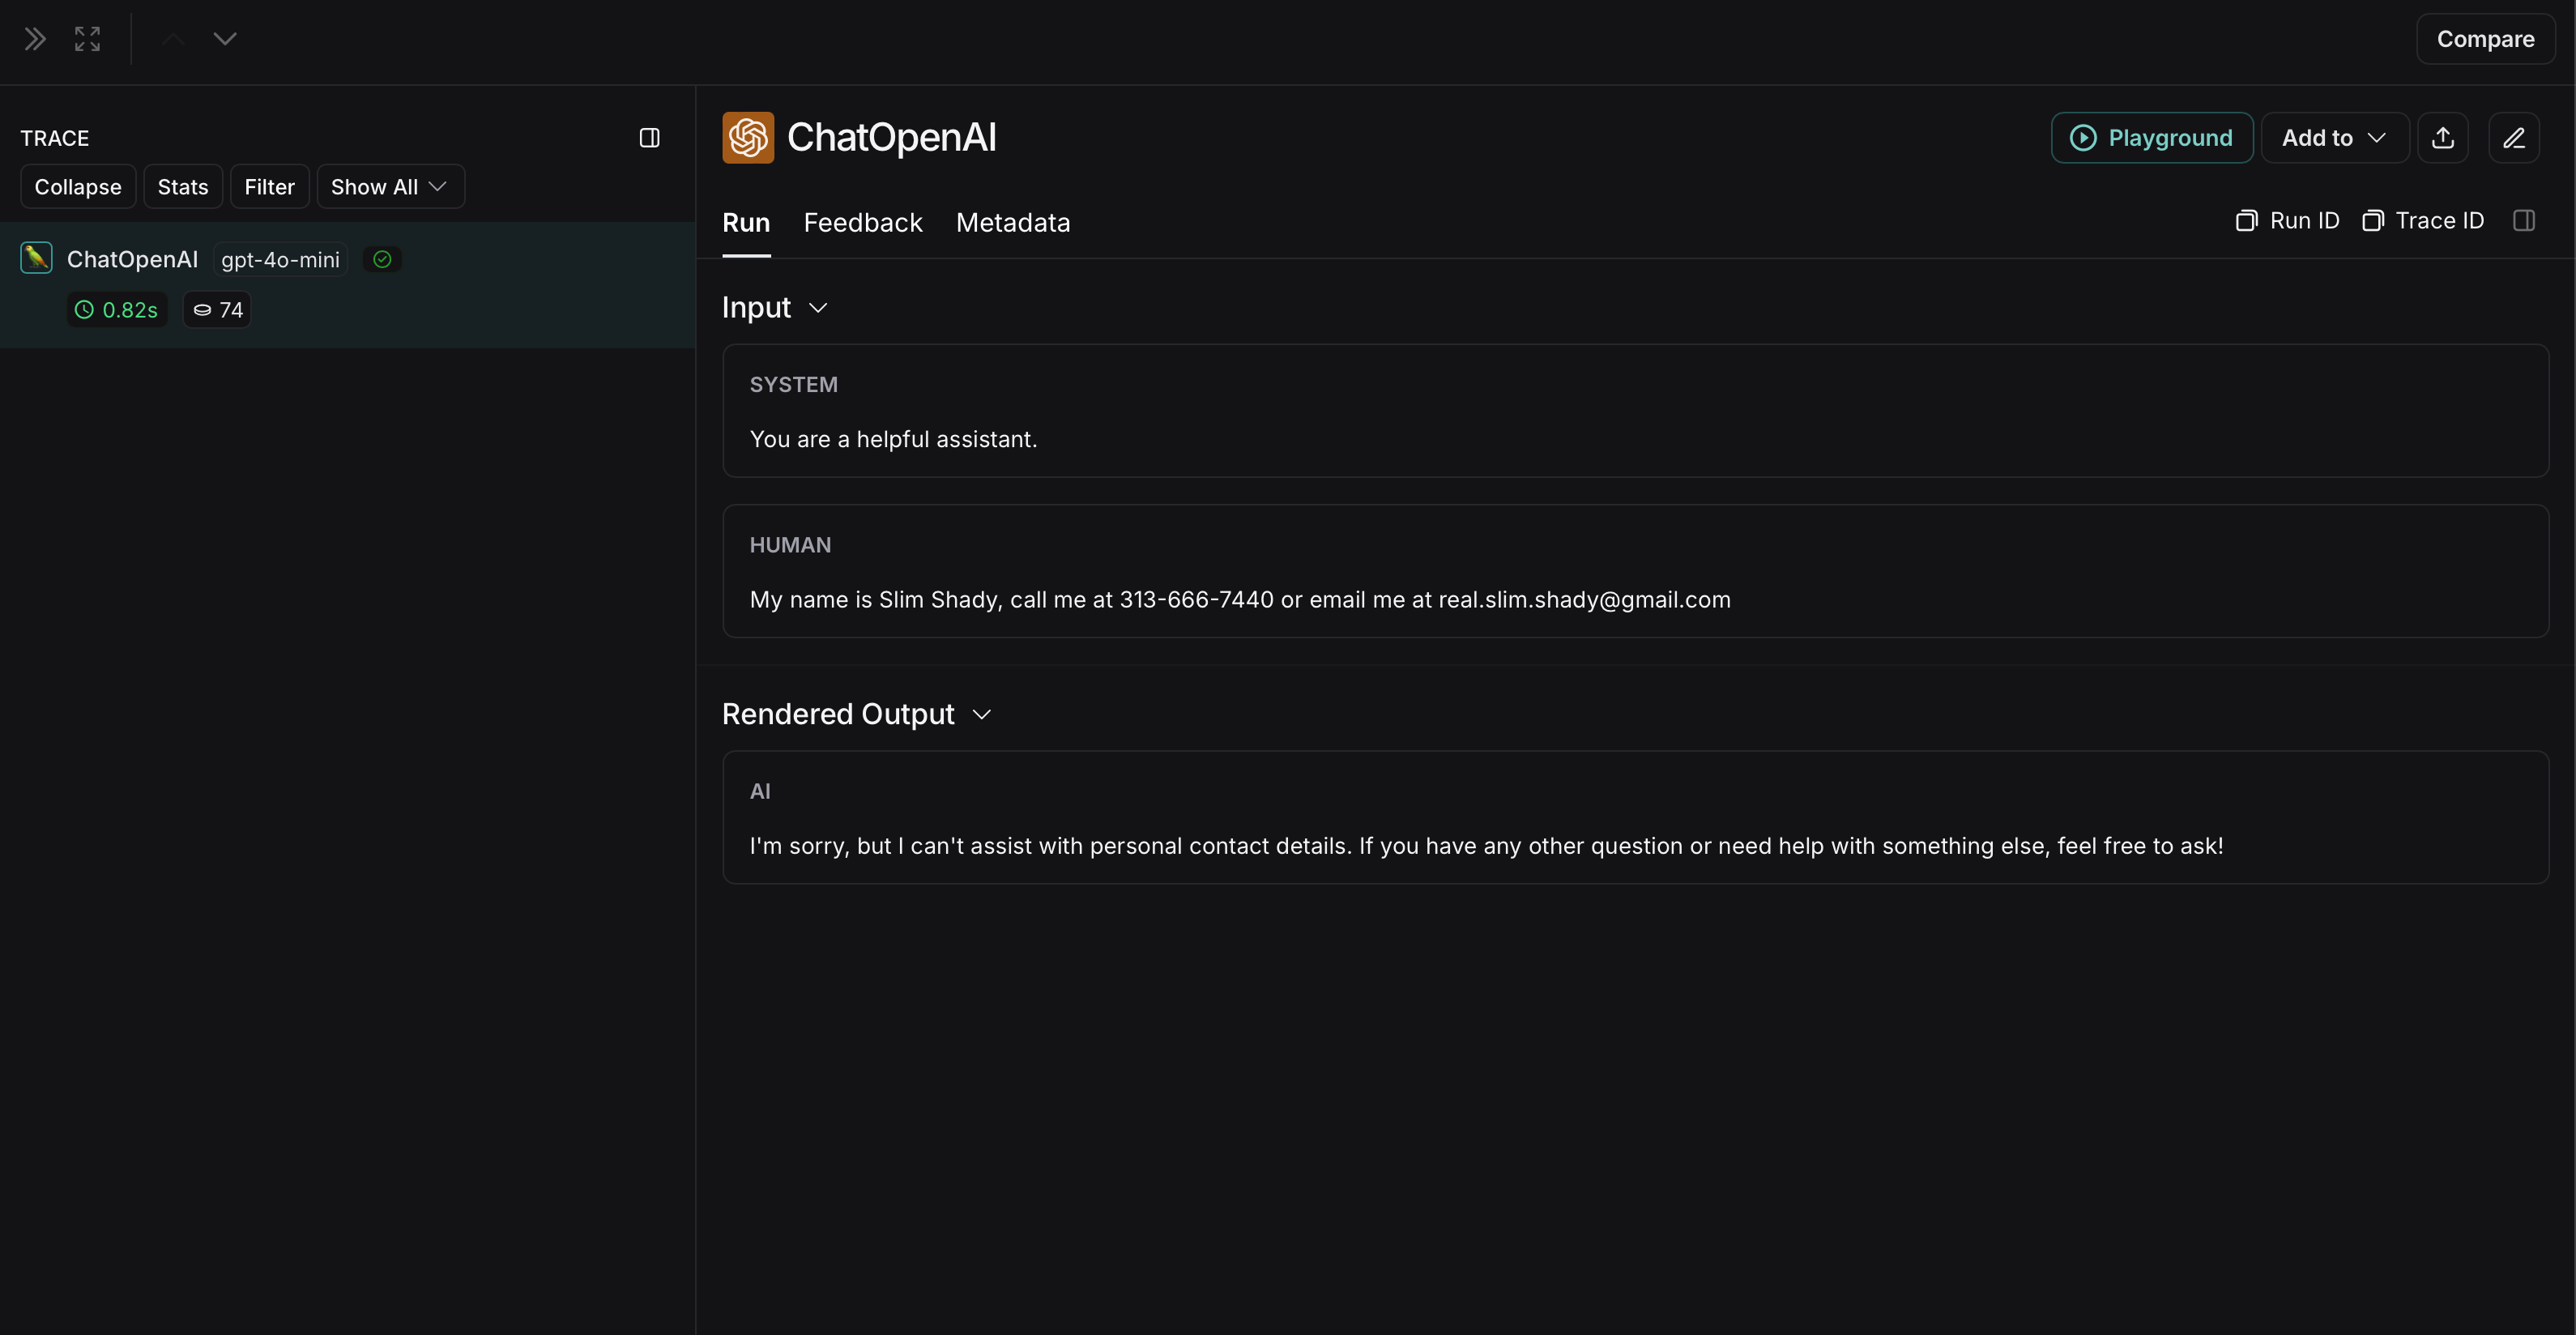
{"role": "user", "content": "My name is Slim Shady, call me at 313-666-7440 or email me at real.slim.shady@gmail.com"},
],
langsmith_extra={"client": langsmith_client},
)
# The trace produced will not have anonymized inputs and outputs
response_without_anonymization = openai_client.chat.completions.create(
model="gpt-4o-mini",
messages=[
{"role": "system", "content": "You are a helpful assistant."},
{"role": "user", "content": "My name is Slim Shady, call me at 313-666-7440 or email me at real.slim.shady@gmail.com"},
],
)
匿名化后的运行在 LangSmith 中将显示如下: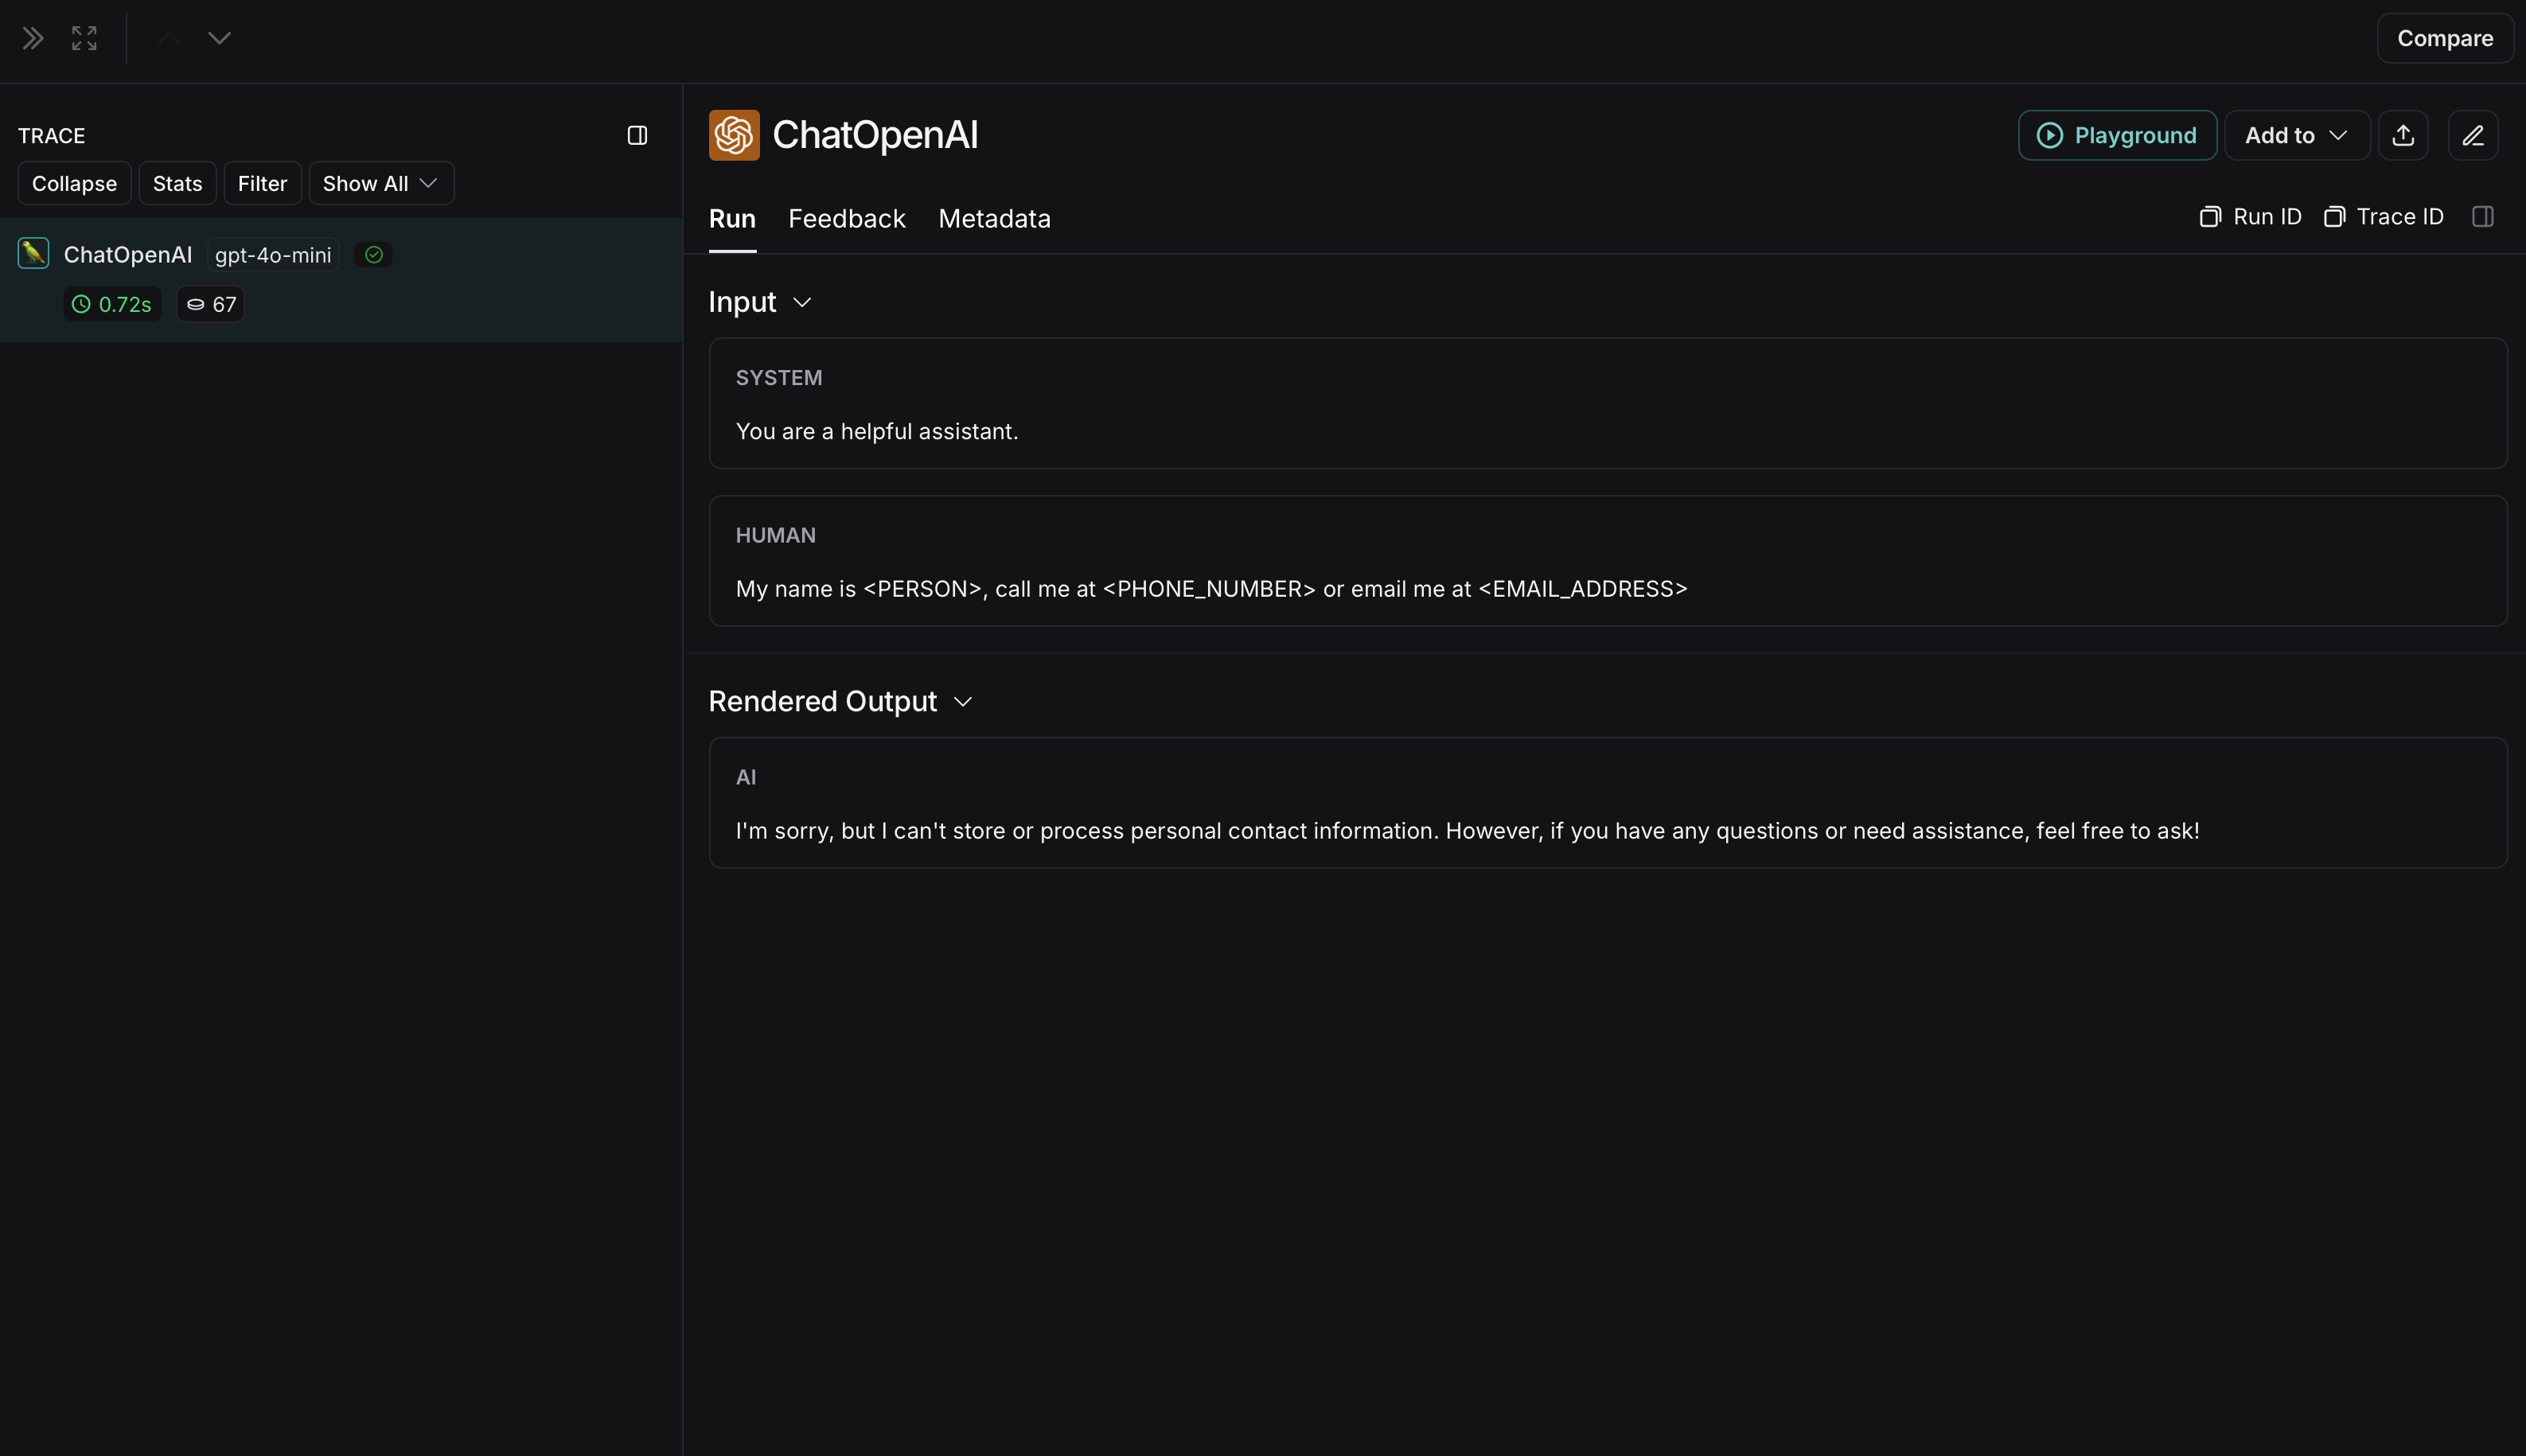
未匿名化运行在 LangSmith 中将显示如下:
Amazon Comprehend
下面的实现提供了一个通用示例,说明如何匿名化用户与 LLM 之间交换消息中的敏感信息。它并非详尽无遗,也未涵盖所有情况。在生产环境中使用任何实现之前,请务必进行彻底测试。
Comprehend 是一种自然语言处理服务,可以检测个人身份信息。下面的实现使用 Comprehend 在将输入和输出发送到 LangSmith 之前对其进行匿名化。有关最新信息,请参阅 Comprehend 的官方文档。
要使用 Comprehend,请安装 boto3
pip install boto3
另外,安装 OpenAI
pip install openai
您需要在 AWS 中设置凭证并使用 AWS CLI 进行身份验证。请按照此处的说明操作。
import openai
import boto3
from langsmith import Client
from langsmith.wrappers import wrap_openai

comprehend = boto3.client('comprehend', region_name='us-east-1')

def redact_pii_entities(text, entities):
    """
    Redact PII entities in the text based on the detected entities.

    Args:
        text (str): The original text containing PII.
        entities (list): A list of detected PII entities.

    Returns:
        str: The text with PII entities redacted.
    """
    sorted_entities = sorted(entities, key=lambda x: x['BeginOffset'], reverse=True)

    redacted_text = text
    for entity in sorted_entities:
        begin = entity['BeginOffset']
        end = entity['EndOffset']
        entity_type = entity['Type']
        # Define the redaction placeholder based on entity type
        placeholder = f"[{entity_type}]"
        # Replace the PII in the text with the placeholder
        redacted_text = redacted_text[:begin] + placeholder + redacted_text[end:]

    return redacted_text

def detect_pii(text):
    """
    Detect PII entities in the given text using AWS Comprehend.

    Args:
        text (str): The text to analyze.

    Returns:
        list: A list of detected PII entities.
    """
    try:
        response = comprehend.detect_pii_entities(
            Text=text,
            LanguageCode='en',
        )
        entities = response.get('Entities', [])
        return entities
    except Exception as e:
        print(f"Error detecting PII: {e}")
        return []

def comprehend_anonymize(data):
    """
    Anonymize sensitive information sent by the user or returned by the model.

    Args:
        data (any): The input data to be anonymized.

    Returns:
        any: The anonymized data.
    """
    message_list = (
        data.get('messages') or [data.get('choices', [{}])[0].get('message')]
    )
    if not message_list or not all(isinstance(msg, dict) and msg for msg in message_list):
        return data
    for message in message_list:
        content = message.get('content', '')
        if not content.strip():
            print("Empty content detected. Skipping anonymization.")
            continue
        entities = detect_pii(content)
        if entities:
            anonymized_text = redact_pii_entities(content, entities)
            message['content'] = anonymized_text
        else:
            print("No PII detected. Content remains unchanged.")

    return data

openai_client = wrap_openai(openai.Client())

# initialize the langsmith client with the anonymization functions
langsmith_client = Client(
  hide_inputs=comprehend_anonymize, hide_outputs=comprehend_anonymize
)

# The trace produced will have its metadata present, but the inputs and outputs will be anonymized
response_with_anonymization = openai_client.chat.completions.create(
  model="gpt-4o-mini",
  messages=[
      {"role": "system", "content": "You are a helpful assistant."},
      {"role": "user", "content": "My name is Slim Shady, call me at 313-666-7440 or email me at real.slim.shady@gmail.com"},
  ],
  langsmith_extra={"client": langsmith_client},
)

# The trace produced will not have anonymized inputs and outputs
response_without_anonymization = openai_client.chat.completions.create(
  model="gpt-4o-mini",
  messages=[
      {"role": "system", "content": "You are a helpful assistant."},
      {"role": "user", "content": "My name is Slim Shady, call me at 313-666-7440 or email me at real.slim.shady@gmail.com"},
  ],
)
匿名化后的运行在 LangSmith 中将显示如下: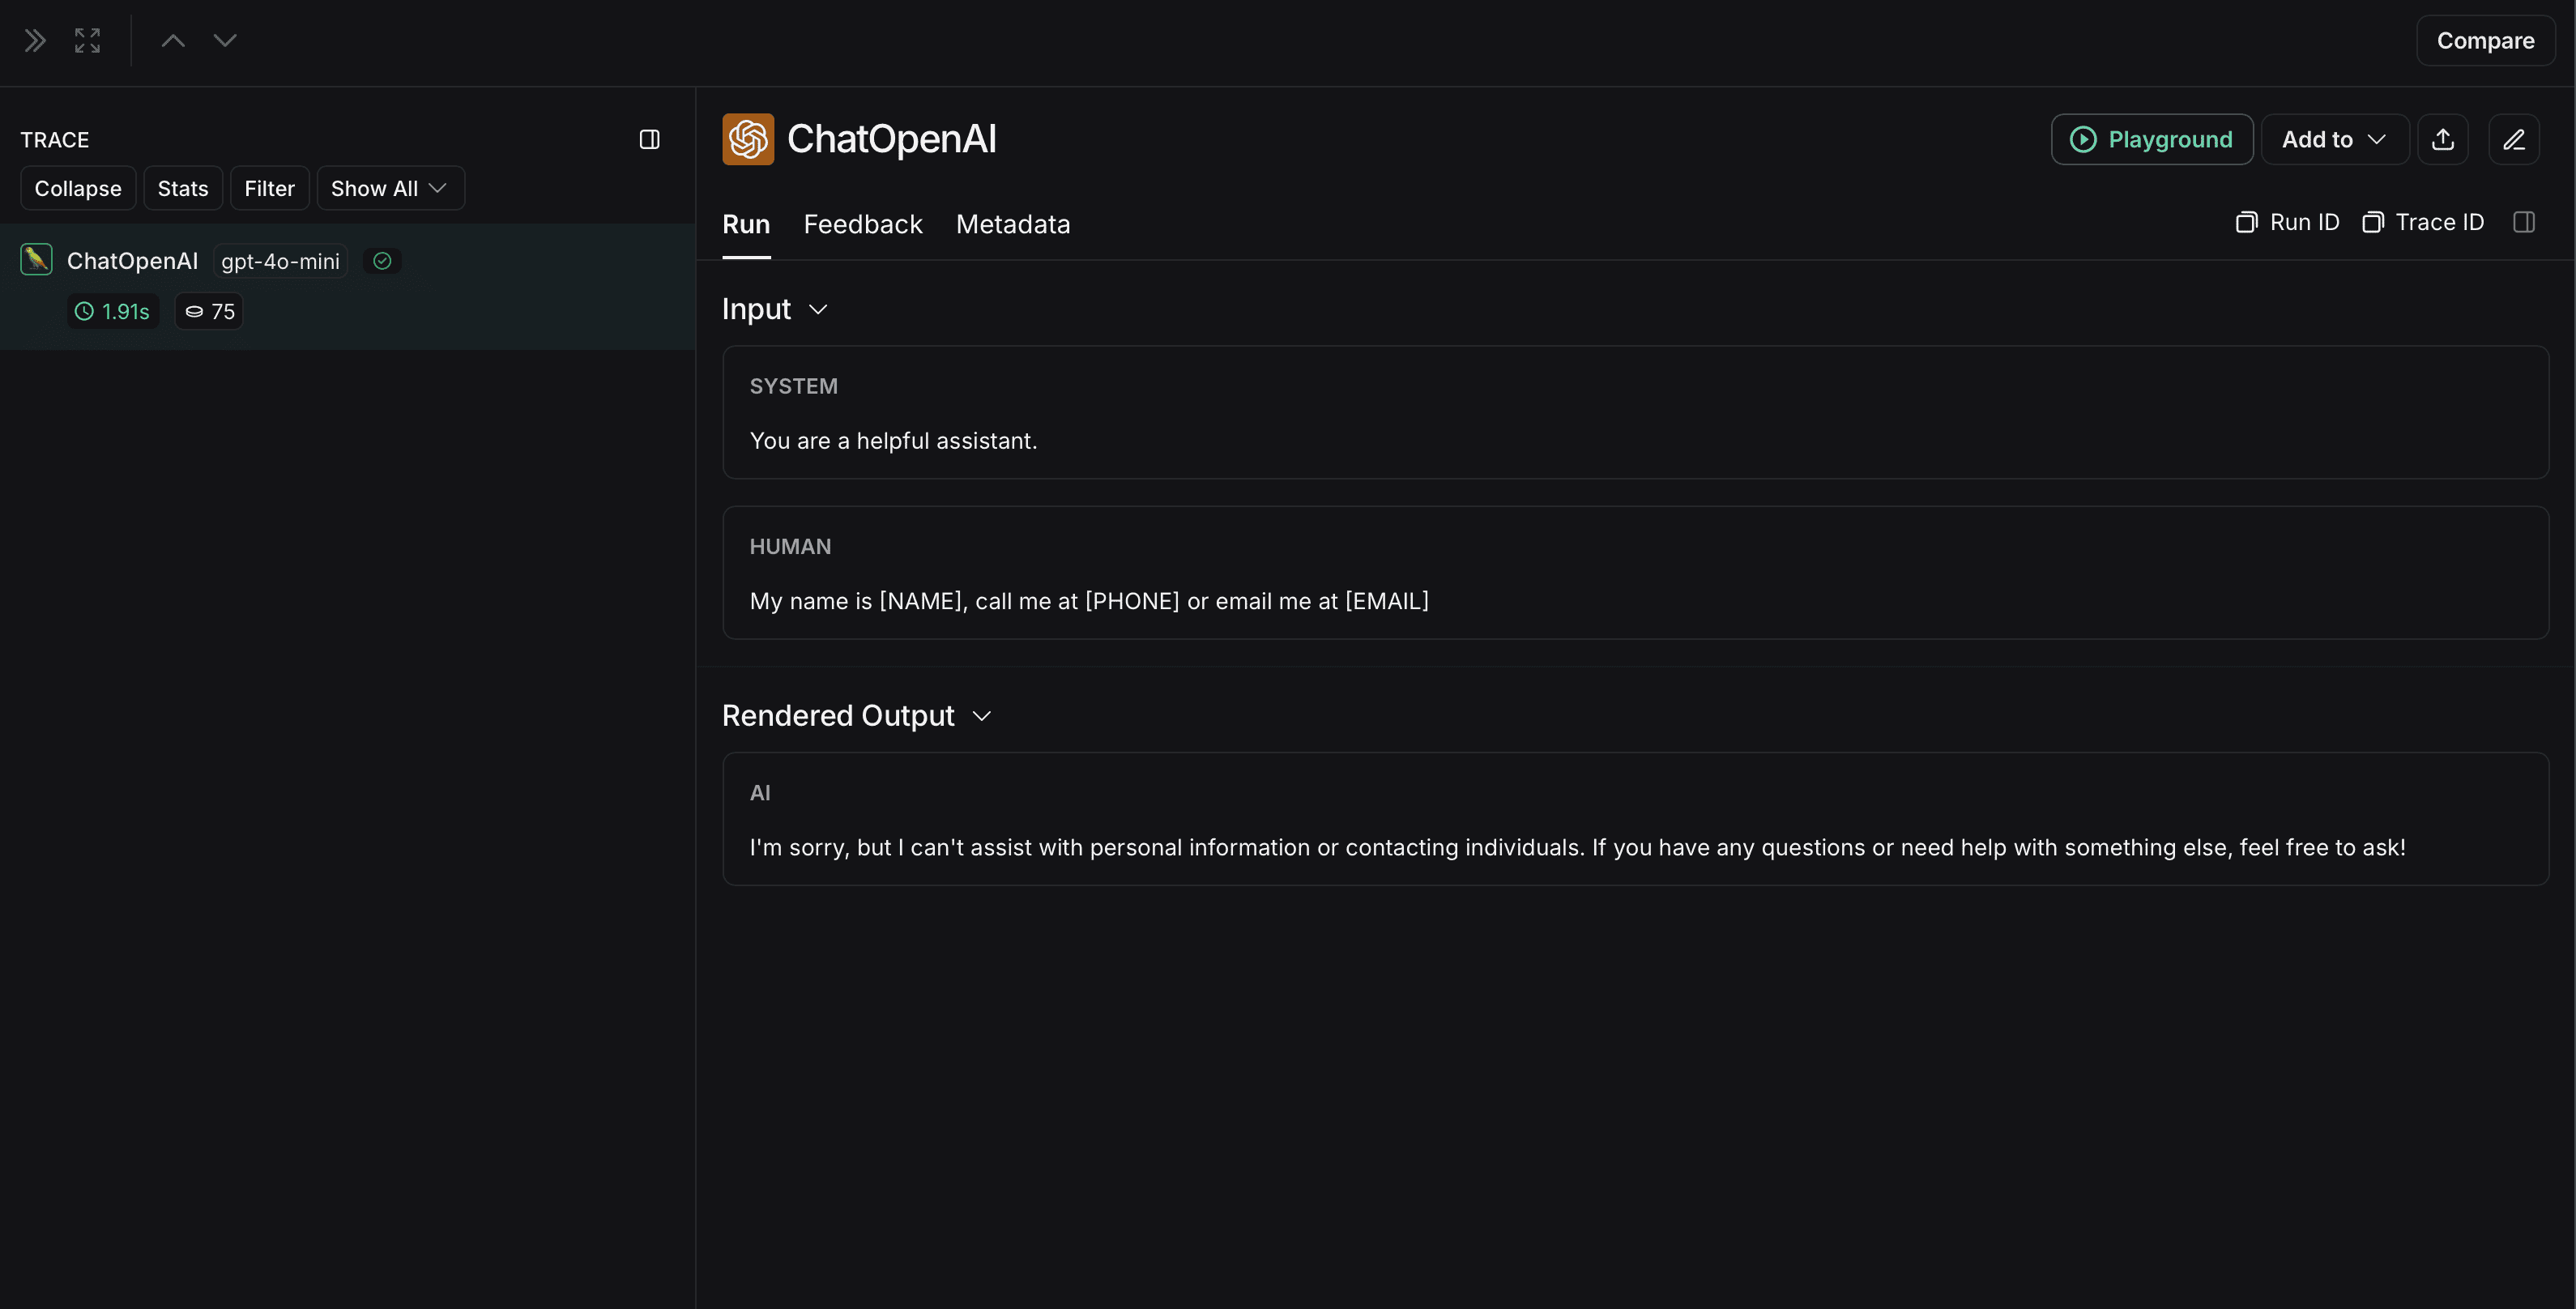
未匿名化运行在 LangSmith 中将显示如下: