为规则设置 Webhook 通知
当您在自动化操作中添加 Webhook URL 时,每当您定义的规则与任何新运行匹配时,我们都会向您的 Webhook 端点发出 POST 请求。
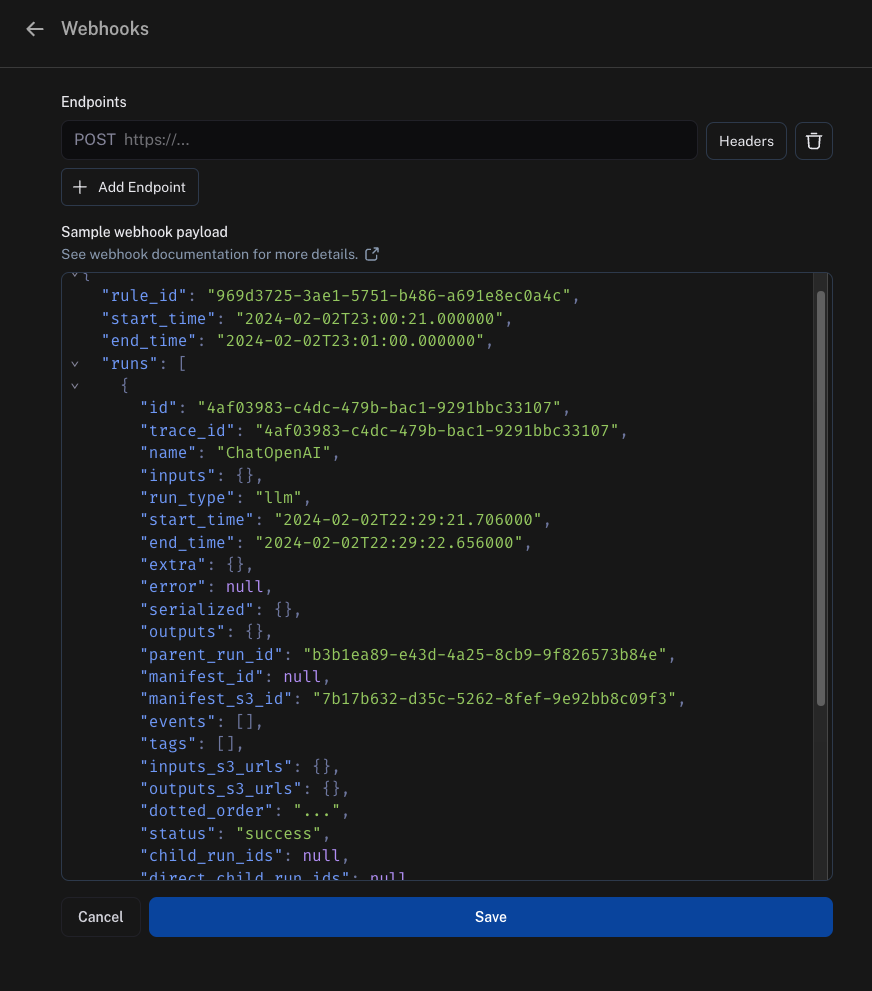
Webhook 有效负载
我们发送到您的 Webhook 端点的有效负载包含
"rule_id"这是发送此有效负载的自动化规则的 ID"start_time"和"end_time"这些是我们找到匹配运行的时间范围"runs"这是一个运行数组,其中每个运行都是一个字典。如果您需要更多关于每个运行的信息,我们建议您在您的端点中使用我们的 SDK 从我们的 API 中获取它。"feedback_stats"这是一个包含运行反馈统计信息的字典。此字段的有效负载示例如下所示。
"feedback_stats": {
    "about_langchain": {
        "n": 1,
        "avg": 0.0,
        "show_feedback_arrow": true,
        "values": {}
    },
    "category": {
        "n": 0,
        "avg": null,
        "show_feedback_arrow": true,
        "values": {
            "CONCEPTUAL": 1
        }
    },
    "user_score": {
        "n": 2,
        "avg": 0.0,
        "show_feedback_arrow": false,
        "values": {}
    },
    "vagueness": {
        "n": 1,
        "avg": 0.0,
        "show_feedback_arrow": true,
        "values": {}
    }
},
根据您的运行时间,inputs_s3_urls 和 outputs_s3_urls 字段可能包含指向实际数据的 S3 URL,而不是数据本身。
inputs 和 outputs 可以分别通过 inputs_s3_urls 和 outputs_s3_urls 中提供的 ROOT.presigned_url 获取。
这是我们发送到您的 Webhook 端点的完整有效负载示例
{
  "rule_id": "d75d7417-0c57-4655-88fe-1db3cda3a47a",
  "start_time": "2024-04-05T01:28:54.734491+00:00",
  "end_time": "2024-04-05T01:28:56.492563+00:00",
  "runs": [
    {
      "status": "success",
      "is_root": true,
      "trace_id": "6ab80f10-d79c-4fa2-b441-922ed6feb630",
      "dotted_order": "20230505T051324571809Z6ab80f10-d79c-4fa2-b441-922ed6feb630",
      "run_type": "tool",
      "modified_at": "2024-04-05T01:28:54.145062",
      "tenant_id": "2ebda79f-2946-4491-a9ad-d642f49e0815",
      "end_time": "2024-04-05T01:28:54.085649",
      "name": "Search",
      "start_time": "2024-04-05T01:28:54.085646",
      "id": "6ab80f10-d79c-4fa2-b441-922ed6feb630",
      "session_id": "6a3be6a2-9a8c-4fc8-b4c6-a8983b286cc5",
      "parent_run_ids": [],
      "child_run_ids": null,
      "direct_child_run_ids": null,
      "total_tokens": 0,
      "completion_tokens": 0,
      "prompt_tokens": 0,
      "total_cost": null,
      "completion_cost": null,
      "prompt_cost": null,
      "first_token_time": null,
      "app_path": "/o/2ebda79f-2946-4491-a9ad-d642f49e0815/projects/p/6a3be6a2-9a8c-4fc8-b4c6-a8983b286cc5/r/6ab80f10-d79c-4fa2-b441-922ed6feb630?trace_id=6ab80f10-d79c-4fa2-b441-922ed6feb630&start_time=2023-05-05T05:13:24.571809",
      "in_dataset": false,
      "last_queued_at": null,
      "inputs": null,
      "inputs_s3_urls": null,
      "outputs": null,
      "outputs_s3_urls": null,
      "extra": null,
      "events": null,
      "feedback_stats": null,
      "serialized": null,
      "share_token": null
    }
  ]
}
Webhook 安全
我们强烈建议您在 Webhook URL 中添加一个秘密查询字符串参数,并在任何传入请求上进行验证。这确保了如果有人发现您的 Webhook URL,您可以将这些调用与真实的 Webhook 通知区分开来。
例如
https://api.example.com/langsmith_webhook?secret=38ee77617c3a489ab6e871fbeb2ec87d
Webhook 自定义 HTTP 头部
如果您想随 Webhook 发送任何特定头部,可以针对每个 URL 进行配置。要进行设置,请点击 URL 字段旁边的 Headers 选项并添加您的头部。
头部以加密格式存储。

Webhook 递送
当将事件递送到您的 Webhook 端点时,我们遵循以下准则
- 如果我们未能连接到您的端点,在宣布递送失败之前,我们将重试传输连接最多 2 次。
- 如果您的端点回复时间超过 5 秒,我们则宣告递送失败,且不进行重试。
- 如果您的端点在不到 5 秒内返回 5xx 状态码,我们将使用指数退避重试最多 2 次。
- 如果您的端点返回 4xx 状态码,我们则宣告递送失败,且不进行重试。
- 您的端点在正文中返回的任何内容都将被忽略
Modal 示例
设置
有关如何设置此项的示例,我们将使用 Modal。Modal 提供用于推理和微调的自动扩缩 GPU、用于代码代理的安全容器化以及无服务器 Python Web 端点。我们将在此处重点介绍 Web 端点。
首先,创建一个 Modal 账户。然后,本地安装 Modal SDK
pip install modal
要完成账户设置,请运行以下命令
modal setup
并按照说明操作
秘钥
接下来,您需要在 Modal 中设置一些秘钥。
首先,LangSmith 需要通过传入秘钥来向 Modal 进行身份验证。最简单的方法是在查询参数中传入一个秘钥。为了验证此秘钥,我们需要在 Modal 中添加一个秘钥来验证它。我们将通过创建 Modal 秘钥来完成此操作。您可以在此处查看秘钥的说明。为此,我们将我们的秘钥命名为 ls-webhook,并让它设置一个名为 LS_WEBHOOK 的环境变量。
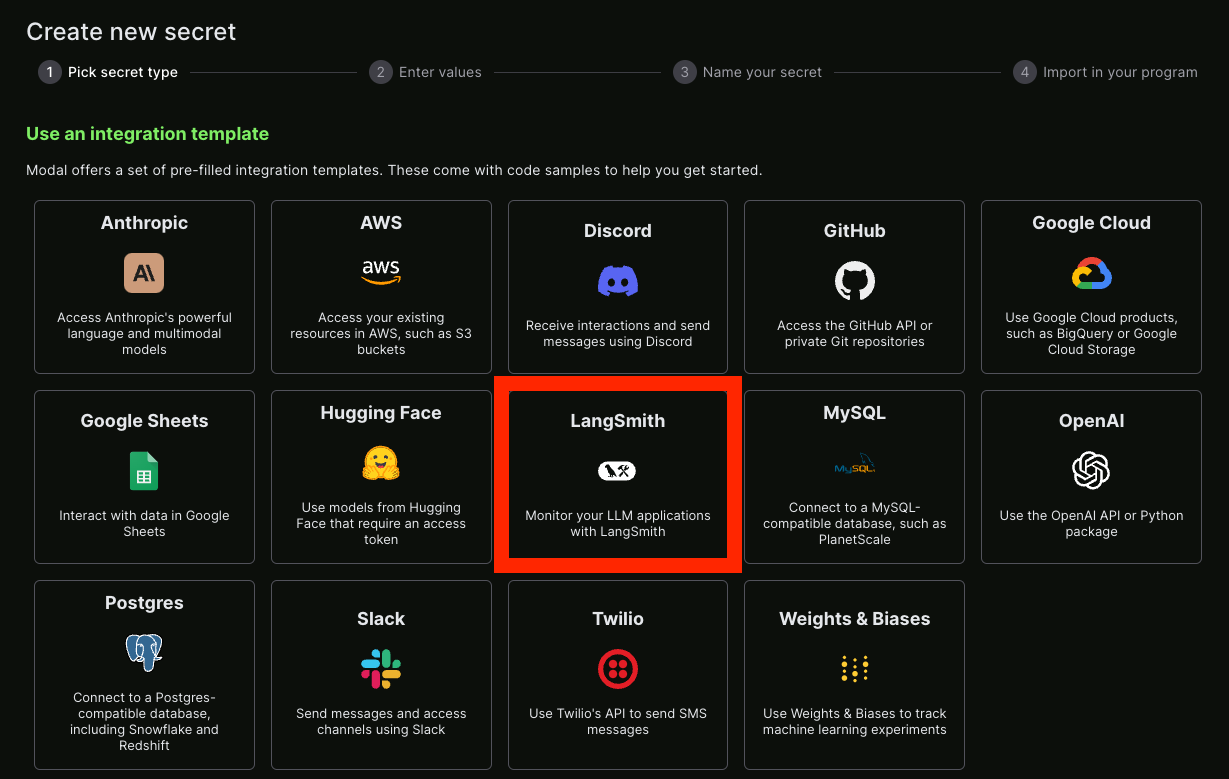
我们还可以设置 LangSmith 秘钥 - 幸运的是,这方面已经有一个集成模板了!
服务
之后,您可以创建一个 Python 文件作为您的端点。下面是一个示例,并附有解释其工作原理的注释
from fastapi import HTTPException, status, Request, Query
from modal import Secret, Stub, web_endpoint, Image

stub = Stub("auth-example", image=Image.debian_slim().pip_install("langsmith"))


@stub.function(
    secrets=[Secret.from_name("ls-webhook"), Secret.from_name("my-langsmith-secret")]
)
# We want this to be a `POST` endpoint since we will post data here
@web_endpoint(method="POST")
# We set up a `secret` query parameter
def f(data: dict, secret: str = Query(...)):
    # You can import dependencies you don't have locally inside Modal functions
    from langsmith import Client

    # First, we validate the secret key we pass
    import os

    if secret != os.environ["LS_WEBHOOK"]:
        raise HTTPException(
            status_code=status.HTTP_401_UNAUTHORIZED,
            detail="Incorrect bearer token",
            headers={"WWW-Authenticate": "Bearer"},
        )

    # This is where we put the logic for what should happen inside this webhook
    ls_client = Client()
    runs = data["runs"]
    ids = [r["id"] for r in runs]
    feedback = list(ls_client.list_feedback(run_ids=ids))
    for r, f in zip(runs, feedback):
        try:
            ls_client.create_example(
                inputs=r["inputs"],
                outputs={"output": f.correction},
                dataset_name="classifier-github-issues",
            )
        except Exception:
            raise ValueError(f"{r} and {f}")
    # Function body
    return "success!"
现在我们可以使用 modal deploy ... 轻松部署它(请参见此处的文档)。
您现在应该会看到类似以下内容
✓ Created objects.
├── 🔨 Created mount /Users/harrisonchase/workplace/langsmith-docs/example-webhook.py
├── 🔨 Created mount PythonPackage:langsmith
└── 🔨 Created f => https://hwchase17--auth-example-f.modal.run
✓ App deployed! 🎉

View Deployment: https://modal.com/apps/hwchase17/auth-example
重要的是要记住 https://hwchase17--auth-example-f.modal.run - 这是我们创建的运行函数。注意:这**不是**最终的部署 URL,请确保不要误用它。
连接起来
现在我们可以使用上面创建的函数 URL,并将其添加为 webhook。我们必须记住也要将密钥作为查询参数传入。综合起来,它应该看起来像这样
https://hwchase17--auth-example-f-dev.modal.run?secret={SECRET}
将 {SECRET} 替换为您为访问 Modal 服务而创建的秘钥。