如何使用 pytest 运行评估(beta 版)
LangSmith pytest 插件允许 Python 开发者将他们的数据集和评估定义为 pytest 测试用例。与 evaluate() 评估流程相比,这在以下情况下很有用:
- 每个示例需要不同的评估逻辑
- 您希望断言二元期望,并在 LangSmith 中跟踪这些断言并在本地(例如在 CI 流水线中)引发断言错误
- 您想要类似 pytest 的终端输出
- 您已经使用 pytest 测试您的应用程序并希望添加 LangSmith 跟踪
pytest 集成处于 beta 阶段,在未来的版本中可能会有所更改。
JS/TS SDK 具有类似的 Vitest/Jest 集成。
安装
此功能需要 Python SDK 版本 langsmith>=0.3.4。
pip install -U "langsmith[pytest]"
定义并运行测试
pytest 集成允许您将数据集和评估器定义为测试用例。
要在 LangSmith 中跟踪测试,请添加 @pytest.mark.langsmith 装饰器。每个带有装饰器的测试用例都将同步到一个数据集示例。当您运行测试套件时,数据集将更新,并会创建一个新实验,其中包含每个测试用例的一个结果。
###################### my_app/main.py ######################
import openai
from langsmith import traceable, wrappers

oai_client = wrappers.wrap_openai(openai.OpenAI())

@traceable
def generate_sql(user_query: str) -> str:
    result = oai_client.chat.completions.create(
        model="gpt-4o-mini",
        messages=[
            {"role": "system", "content": "Convert the user query to a SQL query."},
            {"role": "user", "content": user_query},
        ],
    )
    return result.choices[0].message.content

###################### tests/test_my_app.py ######################
import pytest
from langsmith import testing as t

def is_valid_sql(query: str) -> bool:
    """Return True if the query is valid SQL."""
    return True  # Dummy implementation

@pytest.mark.langsmith  # <-- Mark as a LangSmith test case
def test_sql_generation_select_all() -> None:
    user_query = "Get all users from the customers table"
    t.log_inputs({"user_query": user_query})  # <-- Log example inputs, optional

    expected = "SELECT * FROM customers;"
    t.log_reference_outputs({"sql": expected})  # <-- Log example reference outputs, optional

    sql = generate_sql(user_query)
    t.log_outputs({"sql": sql})  # <-- Log run outputs, optional

    t.log_feedback(key="valid_sql", score=is_valid_sql(sql))  # <-- Log feedback, optional

    assert sql == expected  # <-- Test pass/fail status automatically logged to LangSmith under 'pass' feedback key
当您运行此测试时,它将根据测试用例的通过/失败状态,获得一个默认的 pass 布尔反馈键。它还将跟踪您记录的任何输入、输出和参考(预期)输出。
像往常一样使用 pytest 运行测试
pytest tests/
在大多数情况下,我们建议设置一个测试套件名称
LANGSMITH_TEST_SUITE='SQL app tests' pytest tests/
每次运行此测试套件时,LangSmith 将:
- 为每个测试文件创建数据集。如果此测试文件的数据集已存在,则会更新它
- 在每个已创建/已更新的数据集中创建实验
- 为每个测试用例创建一个实验行,包含您已记录的输入、输出、参考输出和反馈
- 在每个测试用例的
pass反馈键下收集通过/失败率
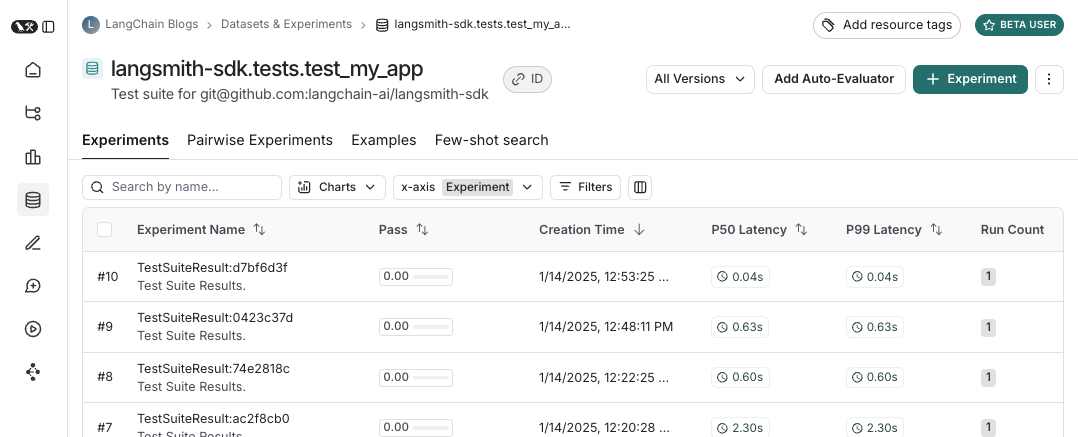
以下是测试套件数据集的样子
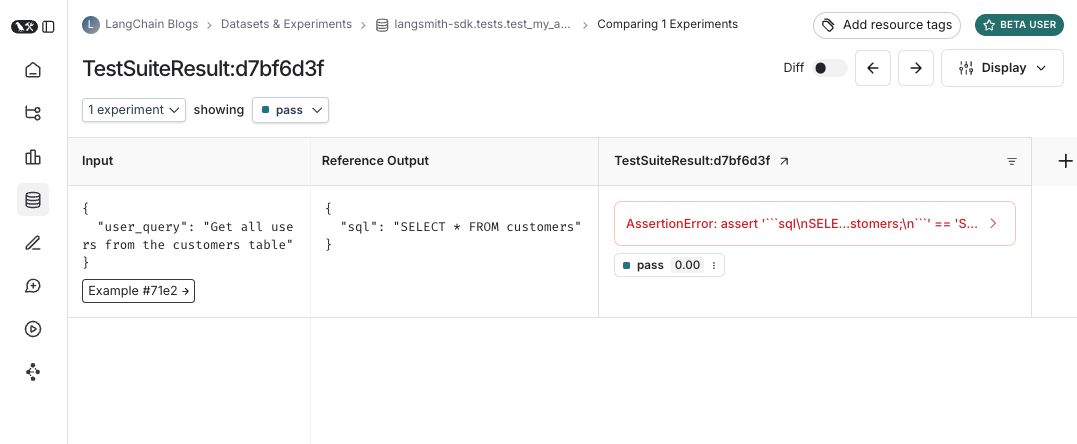
以及针对该测试套件的实验的样子
记录输入、输出和参考输出
每次我们运行测试时,都会将其同步到数据集示例并将其追踪为运行。有几种不同的方法可以追踪示例输入、参考输出和运行输出。最简单的方法是使用 log_inputs、log_outputs 和 log_reference_outputs 方法。您可以在测试中随时运行这些方法来更新该测试的示例和运行。
import pytest
from langsmith import testing as t

@pytest.mark.langsmith
def test_foo() -> None:
    t.log_inputs({"a": 1, "b": 2})
    t.log_reference_outputs({"foo": "bar"})
    t.log_outputs({"foo": "baz"})
    assert True
运行此测试将创建/更新一个名为“test_foo”的示例,输入为 {"a": 1, "b": 2},参考输出为 {"foo": "bar"},并追踪一个运行,其输出为 {"foo": "baz"}。
注意:如果您运行 log_inputs、log_outputs 或 log_reference_outputs 两次,则之前的值将被覆盖。
定义示例输入和参考输出的另一种方法是通过 pytest fixture/参数化。默认情况下,您的测试函数的所有参数都将作为相应示例的输入进行记录。如果某些参数旨在表示参考输出,您可以使用 @pytest.mark.langsmith(output_keys=["name_of_ref_output_arg"]) 指定它们应该被记录为参考输出。
import pytest

@pytest.fixture
def c() -> int:
    return 5

@pytest.fixture
def d() -> int:
    return 6

@pytest.mark.langsmith(output_keys=["d"])
def test_cd(c: int, d: int) -> None:
    result = 2 * c
    t.log_outputs({"d": result})  # Log run outputs
    assert result == d
这将创建/同步一个名为“test_cd”的示例,其输入为 {"c": 5},参考输出为 {"d": 6},运行输出为 {"d": 10}。
记录反馈
默认情况下,LangSmith 会为每个测试用例在 pass 反馈键下收集通过/失败率。您可以使用 log_feedback 添加额外反馈。
import openai
import pytest
from langsmith import wrappers
from langsmith import testing as t

oai_client = wrappers.wrap_openai(openai.OpenAI())

@pytest.mark.langsmith
def test_offtopic_input() -> None:
    user_query = "whats up"
    t.log_inputs({"user_query": user_query})

    sql = generate_sql(user_query)
    t.log_outputs({"sql": sql})

    expected = "Sorry that is not a valid query."
    t.log_reference_outputs({"sql": expected})

    # Use this context manager to trace any steps used for generating evaluation
    # feedback separately from the main application logic
    with t.trace_feedback():
        instructions = (
            "Return 1 if the ACTUAL and EXPECTED answers are semantically equivalent, "
            "otherwise return 0. Return only 0 or 1 and nothing else."
        )
        grade = oai_client.chat.completions.create(
            model="gpt-4o-mini",
            messages=[
                {"role": "system", "content": instructions},
                {"role": "user", "content": f"ACTUAL: {sql}\nEXPECTED: {expected}"},
            ],
        )
        score = float(grade.choices[0].message.content)
        t.log_feedback(key="correct", score=score)

    assert score
请注意 trace_feedback() 上下文管理器的使用。这使得 LLM 作为法官的调用与测试用例的其余部分分开追踪。它不会显示在主测试用例运行中,而是会显示在 correct 反馈键的追踪中。
注意:确保与反馈追踪关联的 log_feedback 调用发生在 trace_feedback 上下文内部。这样,我们就能够将反馈与追踪关联起来,并且在 UI 中查看反馈时,您将能够点击它以查看生成它的追踪。
追踪中间调用
LangSmith 会自动追踪测试用例执行过程中发生的任何可追踪的中间调用。
将测试分组到测试套件中
默认情况下,给定文件中的所有测试都将分组为单个“测试套件”,并具有相应的数据集。您可以通过将 test_suite_name 参数传递给 @pytest.mark.langsmith 进行逐个用例分组,或者可以设置 LANGSMITH_TEST_SUITE 环境变量,将所有执行中的测试分组到单个测试套件中,从而配置测试所属的测试套件。
LANGSMITH_TEST_SUITE="SQL app tests" pytest tests/
我们通常建议设置 LANGSMITH_TEST_SUITE 以获得所有结果的整合视图。
命名实验
您可以使用 LANGSMITH_EXPERIMENT 环境变量命名实验
LANGSMITH_TEST_SUITE="SQL app tests" LANGSMITH_EXPERIMENT="baseline" pytest tests/
缓存
在 CI 中每次提交都调用 LLM 可能会很昂贵。为了节省时间和资源,LangSmith 允许您将 HTTP 请求缓存到磁盘。要启用缓存,请安装 langsmith[pytest] 并设置环境变量 LANGSMITH_TEST_CACHE=/my/cache/path
pip install -U "langsmith[pytest]"
LANGSMITH_TEST_CACHE=tests/cassettes pytest tests/my_llm_tests
所有请求都将缓存到 tests/cassettes 并在后续运行中从那里加载。如果您将其检入您的仓库,您的 CI 也将能够使用缓存。
pytest 功能
@pytest.mark.langsmith 旨在不干扰您的工作,并且与熟悉的 pytest 功能配合良好。
使用 pytest.mark.parametrize 进行参数化
您可以像以前一样使用 parametrize 装饰器。这将为测试的每个参数化实例创建一个新的测试用例。
@pytest.mark.langsmith(output_keys=["expected_sql"])
@pytest.mark.parametrize(
    "user_query, expected_sql",
    [
        ("Get all users from the customers table", "SELECT * FROM customers"),
        ("Get all users from the orders table", "SELECT * FROM orders"),
    ],
)
def test_sql_generation_parametrized(user_query, expected_sql):
    sql = generate_sql(user_query)
    assert sql == expected_sql
注意: 随着参数化列表的增长,您可能需要考虑改用 evaluate()。这可以并行化评估,并使其更容易控制单个实验和相应的数据集。
使用 pytest-xdist 并行化
您可以像往常一样使用 pytest-xdist 来并行执行测试
pip install -U pytest-xdist
pytest -n auto tests
使用 pytest-asyncio 进行异步测试
@pytest.mark.langsmith 适用于同步或异步测试,因此您可以完全像以前一样运行异步测试。
使用 pytest-watch 进行监视模式
使用监视模式快速迭代您的测试。我们强烈建议仅在启用测试缓存(见下文)的情况下使用此功能,以避免不必要的 LLM 调用
pip install pytest-watch
LANGSMITH_TEST_CACHE=tests/cassettes ptw tests/my_llm_tests
丰富输出
如果您想查看测试运行的 LangSmith 结果的丰富显示,可以指定 --langsmith-output
pytest --langsmith-output tests
注意: 此标志在 langsmith<=0.3.3 中曾为 --output=langsmith,但已更新以避免与其他 pytest 插件冲突。
您将获得一个按测试套件分类的漂亮表格,该表格会随着结果上传到 LangSmith 而实时更新
使用此功能的一些重要注意事项
- 确保您已安装
pip install -U "langsmith[pytest]" - 丰富输出目前不适用于
pytest-xdist
注意:自定义输出会删除所有标准的 pytest 输出。如果您正在尝试调试一些意外行为,通常最好显示常规的 pytest 输出以获取完整的错误追踪。
空运行模式
如果您想在不将结果同步到 LangSmith 的情况下运行测试,可以在环境中设置 LANGSMITH_TEST_TRACKING=false。
LANGSMITH_TEST_TRACKING=false pytest tests/
测试将正常运行,但实验日志不会发送到 LangSmith。
期望
LangSmith 提供了一个 expect 工具,帮助您定义对 LLM 输出的期望。例如:
from langsmith import expect

@pytest.mark.langsmith
def test_sql_generation_select_all():
    user_query = "Get all users from the customers table"
    sql = generate_sql(user_query)
    expect(sql).to_contain("customers")
这将把二元“期望”分数记录到实验结果中,同时 assert 期望得到满足,可能会触发测试失败。
expect 还提供了“模糊匹配”方法。例如:
@pytest.mark.langsmith(output_keys=["expectation"])
@pytest.mark.parametrize(
    "query, expectation",
    [
       ("what's the capital of France?", "Paris"),
    ],
)
def test_embedding_similarity(query, expectation):
    prediction = my_chatbot(query)
    expect.embedding_distance(
        # This step logs the distance as feedback for this run
        prediction=prediction, expectation=expectation
    # Adding a matcher (in this case, 'to_be_*"), logs 'expectation' feedback
    ).to_be_less_than(0.5) # Optional predicate to assert against
    expect.edit_distance(
        # This computes the normalized Damerau-Levenshtein distance between the two strings
        prediction=prediction, expectation=expectation
    # If no predicate is provided below, 'assert' isn't called, but the score is still logged
    )
此测试用例将被分配 4 个分数
- 预测与期望之间的
embedding_distance - 二元
expectation分数(如果余弦距离小于 0.5 则为 1,否则为 0) - 预测与期望之间的
edit_distance - 整体测试通过/失败分数(二元)
expect 工具模仿了 Jest 的 expect API,并提供了一些现成功能,以便更轻松地对 LLM 进行评分。
旧版
@test / @unit 装饰器
标记测试用例的旧方法是使用 @test 或 @unit 装饰器
from langsmith import test

@test
def test_foo() -> None:
    pass