使用多模态内容运行评估
LangSmith 允许您创建带有文件附件(如图像、音频文件或文档)的数据集示例,以便在评估使用多模态输入或输出的应用程序时引用它们。
虽然您可以通过 base64 编码将多模态数据包含在示例中,但这种方法效率低下——编码后的数据比原始二进制文件占用更多空间,导致与 LangSmith 之间的传输速度变慢。使用附件则提供两个主要优势
- 由于更高效的二进制文件传输,上传和下载速度更快
- 在 LangSmith UI 中增强不同文件类型的可视化效果
- SDK
- UI
1. 创建带附件的示例
要使用 SDK 上传带附件的示例,请使用 create_examples / update_examples Python 方法或 uploadExamplesMultipart / updateExamplesMultipart TypeScript 方法。
- Python
- TypeScript
要求 langsmith>=0.3.13
import requests
import uuid
from pathlib import Path
from langsmith import Client

# Publicly available test files
pdf_url = "https://www.w3.org/WAI/ER/tests/xhtml/testfiles/resources/pdf/dummy.pdf"
wav_url = "https://openaiassets.blob.core.windows.net/$web/API/docs/audio/alloy.wav"
img_url = "https://www.w3.org/Graphics/PNG/nurbcup2si.png"

# Fetch the files as bytes
pdf_bytes = requests.get(pdf_url).content
wav_bytes = requests.get(wav_url).content
img_bytes = requests.get(img_url).content

# Create the dataset
ls_client = Client()
dataset_name = "attachment-test-dataset"
dataset = ls_client.create_dataset(
  dataset_name=dataset_name,
  description="Test dataset for evals with publicly available attachments",
)

inputs = {
  "audio_question": "What is in this audio clip?",
  "image_question": "What is in this image?",
}

outputs = {
  "audio_answer": "The sun rises in the east and sets in the west. This simple fact has been observed by humans for thousands of years.",
  "image_answer": "A mug with a blanket over it.",
}

# Define an example with attachments
example_id = uuid.uuid4()
example = {
  "id": example_id,
  "inputs": inputs,
  "outputs": outputs,
  "attachments": {
      "my_pdf": {"mime_type": "application/pdf", "data": pdf_bytes},
      "my_wav": {"mime_type": "audio/wav", "data": wav_bytes},
      "my_img": {"mime_type": "image/png", "data": img_bytes},
      # Example of an attachment specified via a local file path:
      # "my_local_img": {"mime_type": "image/png", "data": Path(__file__).parent / "my_local_img.png"},
  },
}

# Create the example
ls_client.create_examples(
  dataset_id=dataset.id,
  examples=[example],
  # Uncomment this flag if you'd like to upload attachments from local files:
  # dangerously_allow_filesystem=True
)
要求版本 >= 0.2.13
您可以使用 uploadExamplesMultipart 方法上传带附件的示例。
请注意,这与标准 createExamples 方法不同,后者目前不支持附件。每个附件都需要 Uint8Array 或 ArrayBuffer 作为数据类型。
Uint8Array:用于直接处理二进制数据。ArrayBuffer:表示固定长度的二进制数据,可根据需要转换为Uint8Array。
请注意,您不能在 TypeScript SDK 中直接传入文件路径,因为并非所有运行时环境都支持访问本地文件。
import { Client } from "langsmith";
import { v4 as uuid4 } from "uuid";

// Publicly available test files
const pdfUrl = "https://www.w3.org/WAI/ER/tests/xhtml/testfiles/resources/pdf/dummy.pdf";
const wavUrl = "https://openaiassets.blob.core.windows.net/$web/API/docs/audio/alloy.wav";
const pngUrl = "https://www.w3.org/Graphics/PNG/nurbcup2si.png";

// Helper function to fetch file as ArrayBuffer
async function fetchArrayBuffer(url: string): Promise<ArrayBuffer> {
const response = await fetch(url);
if (!response.ok) {
  throw new Error(`Failed to fetch ${url}: ${response.statusText}`);
}
  return response.arrayBuffer();
}

// Fetch files as ArrayBuffer
const pdfArrayBuffer = await fetchArrayBuffer(pdfUrl);
const wavArrayBuffer = await fetchArrayBuffer(wavUrl);
const pngArrayBuffer = await fetchArrayBuffer(pngUrl);

// Create the LangSmith client (Ensure LANGSMITH_API_KEY is set in env)
const langsmithClient = new Client();

// Create a unique dataset name
const datasetName = "attachment-test-dataset:" + uuid4().substring(0, 8);

// Create the dataset
const dataset = await langsmithClient.createDataset(datasetName, {
  description: "Test dataset for evals with publicly available attachments",
});

// Define the example with attachments
const exampleId = uuid4();
const example = {
  id: exampleId,
  inputs: {
      audio_question: "What is in this audio clip?",
      image_question: "What is in this image?",
  },
  outputs: {
      audio_answer: "The sun rises in the east and sets in the west. This simple fact has been observed by humans for thousands of years.",
      image_answer: "A mug with a blanket over it.",
  },
attachments: {
my_pdf: {
mimeType: "application/pdf",
data: pdfArrayBuffer
},
my_wav: {
mimeType: "audio/wav",
data: wavArrayBuffer
},
my_img: {
mimeType: "image/png",
data: pngArrayBuffer
},
},
};

// Upload the example with attachments to the dataset
await langsmithClient.uploadExamplesMultipart(dataset.id, [example]);
除了以字节形式传入外,附件还可以指定为本地文件的路径。为此,请为附件的 data 值传入路径,并指定参数 dangerously_allow_filesystem=True
client.create_examples(..., dangerously_allow_filesystem=True)
2. 运行评估
定义目标函数
现在我们有了一个包含带附件示例的数据集,我们可以定义一个目标函数来运行这些示例。以下示例仅使用 OpenAI 的 GPT-4o 模型来回答有关图像和音频剪辑的问题。
- Python
- TypeScript
您正在评估的目标函数必须有两个位置参数才能使用与示例关联的附件,第一个参数必须命名为 inputs,第二个参数必须命名为 attachments。
inputs参数是一个字典,其中包含示例的输入数据,不包括附件。attachments参数是一个字典,它将附件名称映射到一个包含预签名 URL、mime_type 和文件字节内容读取器的字典。您可以使用预签名 URL 或读取器来获取文件内容。附件字典中的每个值都是一个具有以下结构的字典
{
    "presigned_url": str,
    "mime_type": str,
    "reader": BinaryIO
}
from langsmith.wrappers import wrap_openai

import base64
from openai import OpenAI

client = wrap_openai(OpenAI())

# Define target function that uses attachments
def file_qa(inputs, attachments): # Read the audio bytes from the reader and encode them in base64
  audio_reader = attachments["my_wav"]["reader"]
  audio_b64 = base64.b64encode(audio_reader.read()).decode('utf-8')
  audio_completion = client.chat.completions.create(
      model="gpt-4o-audio-preview",
      messages=[
          {
              "role": "user",
              "content": [
                  {
                      "type": "text",
                      "text": inputs["audio_question"]
                  },
                  {
                      "type": "input_audio",
                      "input_audio": {
                          "data": audio_b64,
                          "format": "wav"
                      }
                  }
              ]
          }
      ]
  )

  # Most models support taking in an image URL directly in addition to base64 encoded images
  # You can pipe the image pre-signed URL directly to the model
  image_url = attachments["my_img"]["presigned_url"]
  image_completion = client.chat.completions.create(
      model="gpt-4o-mini",
      messages=[
        {
          "role": "user",
          "content": [
            {"type": "text", "text": inputs["image_question"]},
            {
              "type": "image_url",
              "image_url": {
                "url": image_url,
              },
            },
          ],
        }
      ],
  )

  return {
      "audio_answer": audio_completion.choices[0].message.content,
      "image_answer": image_completion.choices[0].message.content,
  }
在 TypeScript SDK 中,如果 includeAttachments 设置为 true,则使用 config 参数将附件传递给目标函数。
config 将包含 attachments,它是一个将附件名称映射到以下形式对象的对象
{
presigned_url: string,
mime_type: string,
}
import OpenAI from "openai";
import { wrapOpenAI } from "langsmith/wrappers";

const client: any = wrapOpenAI(new OpenAI());

async function fileQA(inputs: Record<string, any>, config?: Record<string, any>) {
const presignedUrl = config?.attachments?.["my_wav"]?.presigned_url;
if (!presignedUrl) {
throw new Error("No presigned URL provided for audio.");
}

const response = await fetch(presignedUrl);
if (!response.ok) {
throw new Error(`Failed to fetch audio: ${response.statusText}`);
}

const arrayBuffer = await response.arrayBuffer();
const uint8Array = new Uint8Array(arrayBuffer);
const audioB64 = Buffer.from(uint8Array).toString("base64");

const audioCompletion = await client.chat.completions.create({
model: "gpt-4o-audio-preview",
messages: [
{
role: "user",
content: [
{ type: "text", text: inputs["audio_question"] },
{
type: "input_audio",
input_audio: {
data: audioB64,
format: "wav",
},
},
],
},
],
});

const imageUrl = config?.attachments?.["my_img"]?.presigned_url
const imageCompletion = await client.chat.completions.create({
model: "gpt-4o-mini",
messages: [
{
role: "user",
content: [
{ type: "text", text: inputs["image_question"] },
{
type: "image_url",
image_url: {
url: imageUrl,
},
},
],
},
],
});

return {
audio_answer: audioCompletion.choices[0].message.content,
image_answer: imageCompletion.choices[0].message.content,
};
}
定义自定义评估器
确定评估器是否应接收附件的规则与上述完全相同。
下面的评估器使用 LLM 来判断推理和答案是否一致。要了解有关如何定义基于 LLM 的评估器的更多信息,请参阅此指南。
- Python
- TypeScript
# Assumes you've installed pydantic
from pydantic import BaseModel

def valid_image_description(outputs: dict, attachments: dict) -> bool:
  """Use an LLM to judge if the image description and images are consistent."""

  instructions = """
  Does the description of the following image make sense?
  Please carefully review the image and the description to determine if the description is valid."""

  class Response(BaseModel):
      description_is_valid: bool

  image_url = attachments["my_img"]["presigned_url"]
  response = client.beta.chat.completions.parse(
      model="gpt-4o",
      messages=[
          {
              "role": "system",
              "content": instructions
          },
          {
              "role": "user",
              "content": [
                  {"type": "image_url", "image_url": {"url": image_url}},
                  {"type": "text", "text": outputs["image_answer"]}
              ]
          }
      ],
      response_format=Response
  )

  return response.choices[0].message.parsed.description_is_valid

ls_client.evaluate(
  file_qa,
  data=dataset_name,
  evaluators=[valid_image_description],
)
import { zodResponseFormat } from 'openai/helpers/zod';
import { z } from 'zod';
import { evaluate } from "langsmith/evaluation";

const DescriptionResponse = z.object({
description_is_valid: z.boolean(),
});

async function validImageDescription({
outputs,
attachments,
}: {
outputs?: any;
attachments?: any;
}): Promise<{ key: string; score: boolean}> {
const instructions = `Does the description of the following image make sense?
Please carefully review the image and the description to determine if the description is valid.`;

  const imageUrl = attachments?.["my_img"]?.presigned_url

  const completion = await client.beta.chat.completions.parse({
      model: "gpt-4o",
      messages: [
          {
              role: "system",
              content: instructions,
          },
          {
              role: "user",
              content: [
                  { type: "image_url", image_url: { url: imageUrl } },
                  { type: "text", text: outputs?.image_answer },
              ],
          },
      ],
      response_format: zodResponseFormat(DescriptionResponse, 'imageResponse'),
  });

  const score: boolean = completion.choices[0]?.message?.parsed?.description_is_valid ?? false;
  return { key: "valid_image_description", score };

}

const resp = await evaluate(fileQA, {
data: datasetName,
// Need to pass flag to include attachments
includeAttachments: true,
evaluators: [validImageDescription],
client: langsmithClient
});
更新带附件的示例
在上面的代码中,我们展示了如何向数据集添加带附件的示例。也可以使用 SDK 更新这些相同的示例。
与现有示例一样,当您使用附件更新数据集时,数据集会进行版本控制。因此,您可以导航到数据集版本历史记录以查看对每个示例所做的更改。要了解更多信息,请参阅此指南。
更新带附件的示例时,您可以通过几种不同的方式更新附件
- 传入新附件
- 重命名现有附件
- 删除现有附件
请注意
- 任何未明确重命名或保留的现有附件都将被删除。
- 如果您向
retain或rename传入不存在的附件名称,将引发错误。 - 如果
attachments和attachment_operations字段中出现相同的附件名称,新附件将优先于现有附件。
- Python
- TypeScript
example_update = {
  "id": example_id,
  "attachments": {
      # These are net new attachments
      "my_new_file": ("text/plain", b"foo bar"),
  },
  "inputs": inputs,
  "outputs": outputs,
  # Any attachments not in rename/retain will be deleted.
  # In this case, that would be "my_img" if we uploaded it.
  "attachments_operations": {
      # Retained attachments will stay exactly the same
      "retain": ["my_pdf"],
      # Renaming attachments preserves the original data
      "rename": {
          "my_wav": "my_new_wav",
      }
  },
}

ls_client.update_examples(dataset_id=dataset.id, updates=[example_update])
import { ExampleUpdateWithAttachments } from "langsmith/schemas";

const exampleUpdate: ExampleUpdateWithAttachments = {
id: exampleId,
attachments: {
// These are net new attachments
"my_new_file": {
mimeType: "text/plain",
data: Buffer.from("foo bar")
},
},
attachments_operations: {
// Retained attachments will stay exactly the same
retain: ["my_img"],
// Renaming attachments preserves the original data
rename: {
"my_wav": "my_new_wav",
},
// Any attachments not in rename/retain will be deleted
// In this case, that would be "my_pdf"
},
};

await langsmithClient.updateExamplesMultipart(
dataset.id,
[exampleUpdate],
);
1. 创建带附件的示例
您可以通过几种不同的方式向数据集添加带附件的示例。
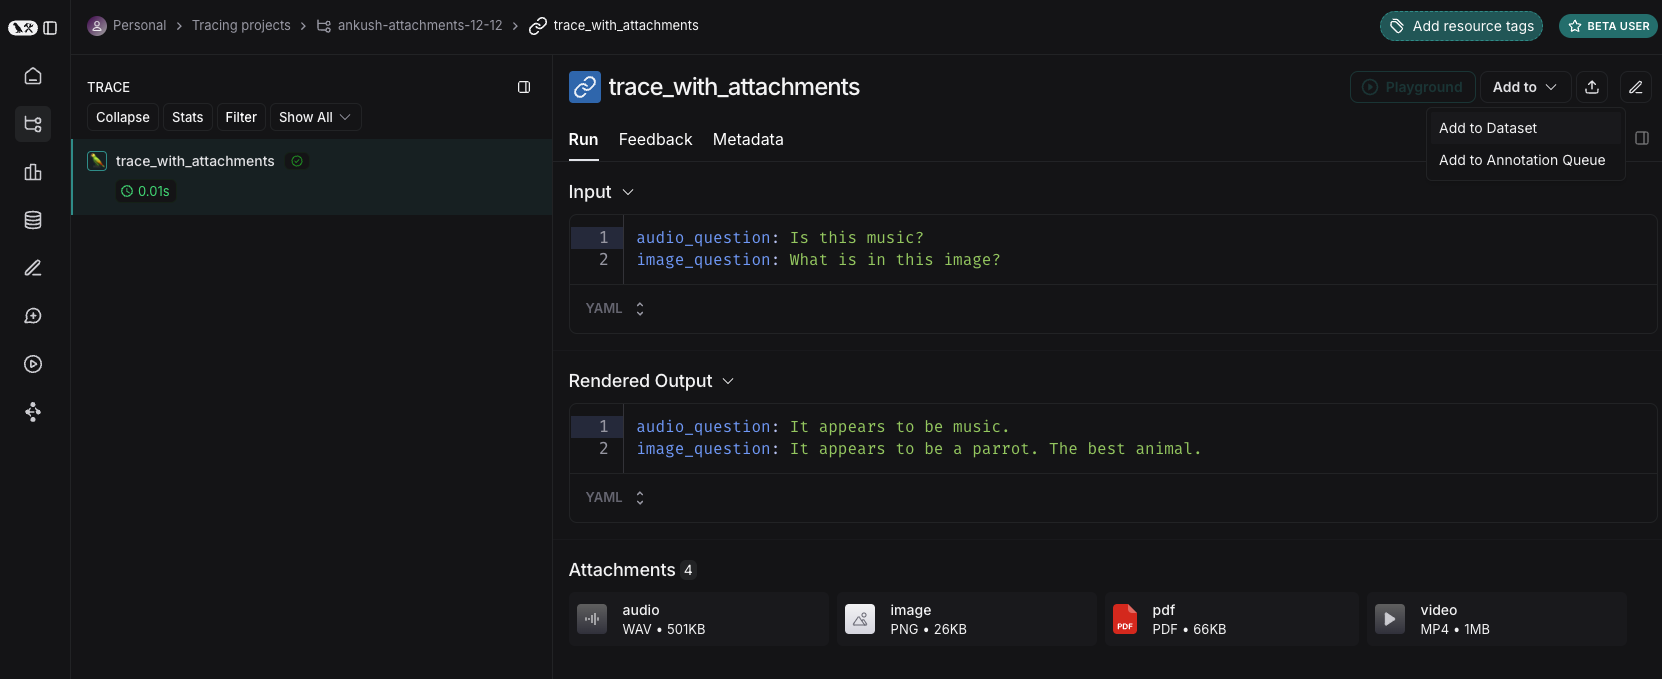
从现有运行
将运行添加到 LangSmith 数据集时,附件可以从源运行选择性地传播到目标示例。要了解更多信息,请参阅此指南。
从头开始
您可以直接从 LangSmith UI 创建带附件的示例。在数据集 UI 的“Examples”选项卡中单击“+ Example”按钮。然后使用“Upload Files”按钮上传附件
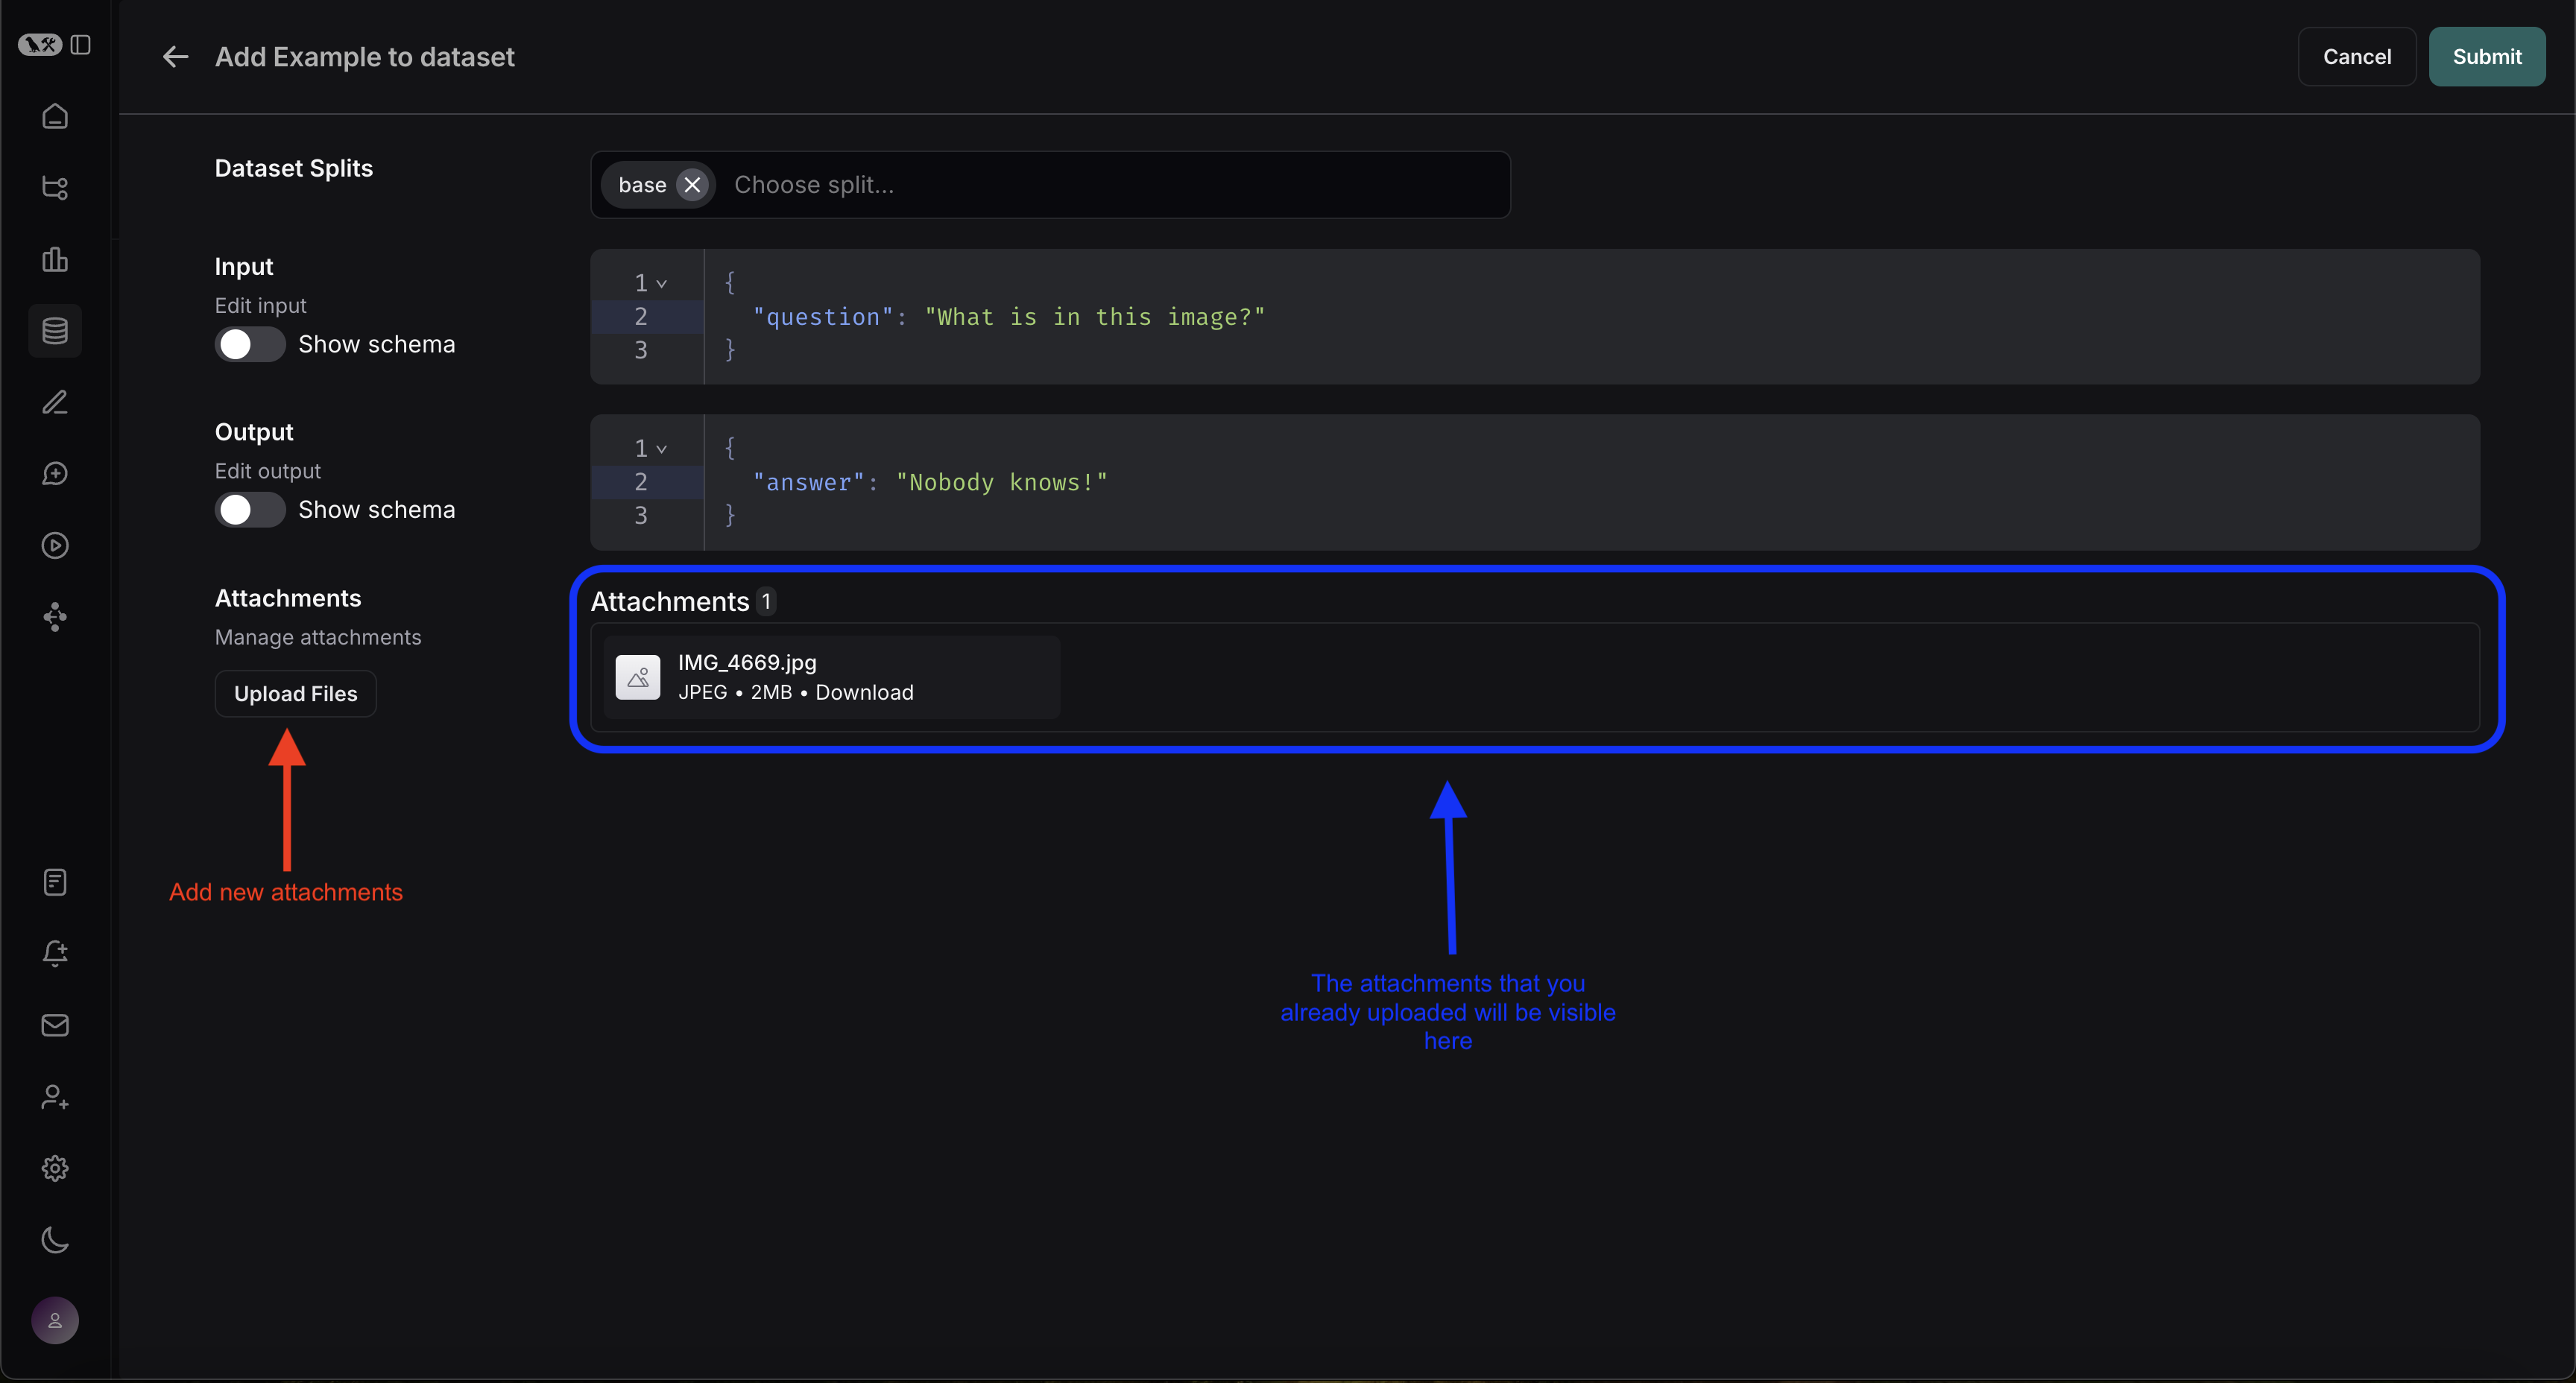
上传后,您可以在 LangSmith UI 中查看带附件的示例。每个附件都将显示预览,以便于检查。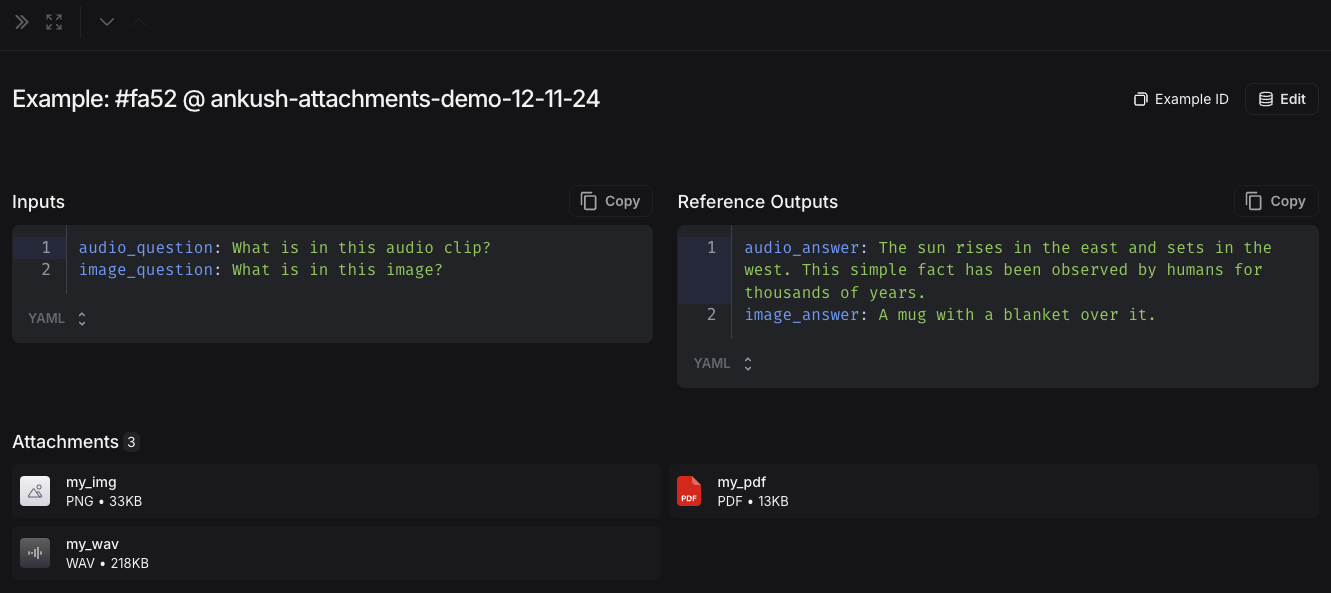
2. 创建多模态提示
LangSmith UI 允许您在评估多模态模型时在提示中包含附件
首先,在您要添加多模态内容的消息中单击文件图标。接下来,为每个示例添加您要包含的附件的模板变量。
- 对于单一附件类型:使用建议的变量名。注意:所有示例都必须有一个同名附件。
- 对于多个附件,或者如果您的附件名称在不同示例之间有所不同:使用
All attachments变量为每个示例包含所有可用附件。

定义自定义评估器
LangSmith 演练场目前不支持将多模态内容导入评估器。如果这对您的用例有帮助,请在LangChain 社区 Slack 中告诉我们(如果您还不是会员,请在此处注册)!
您可以通过添加一个接受示例输入和输出的评估器来评估模型的文本输出。即使评估器不支持多模态,您仍然可以运行纯文本评估。例如
- OCR → 文本校正:使用视觉模型从文档中提取文本,然后评估提取输出的准确性。
- 语音转文本 → 转录质量:使用语音模型将音频转录为文本,然后对照您的参考评估转录质量。
有关定义自定义评估器的更多信息,请参阅LLM as Judge 指南。
更新带附件的示例
在 UI 中,附件大小限制为 20MB。
在 UI 中编辑示例时,您可以
- 上传新附件
- 重命名和删除附件
- 使用快速重置按钮将附件重置为之前状态
在您点击提交之前,更改不会保存。
